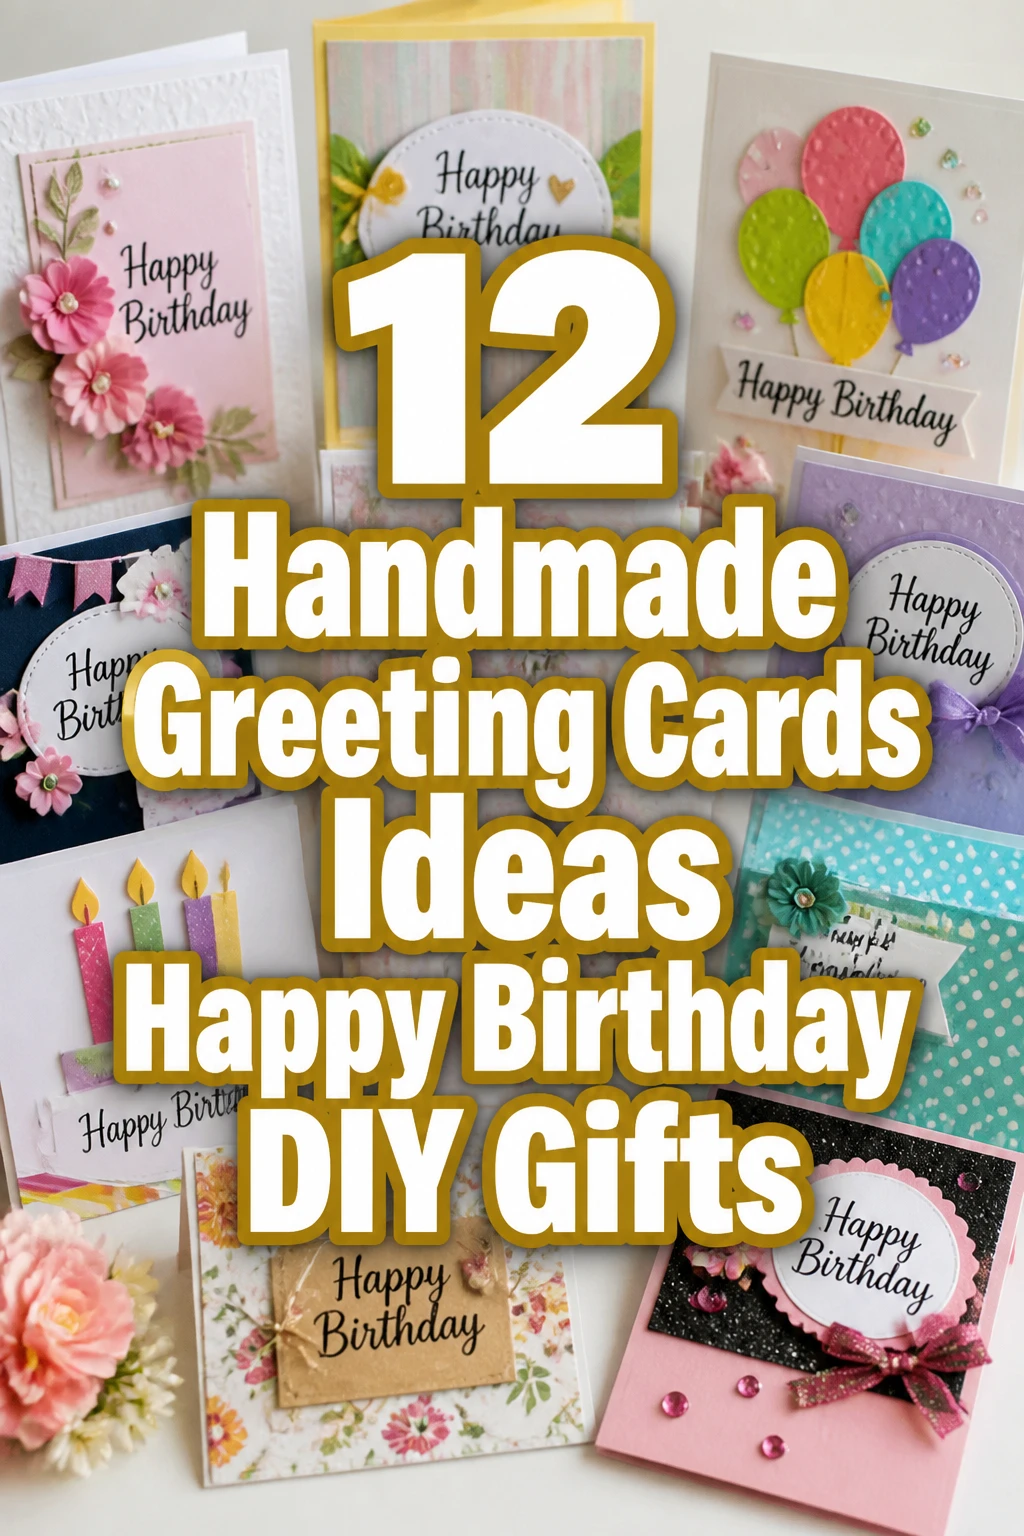
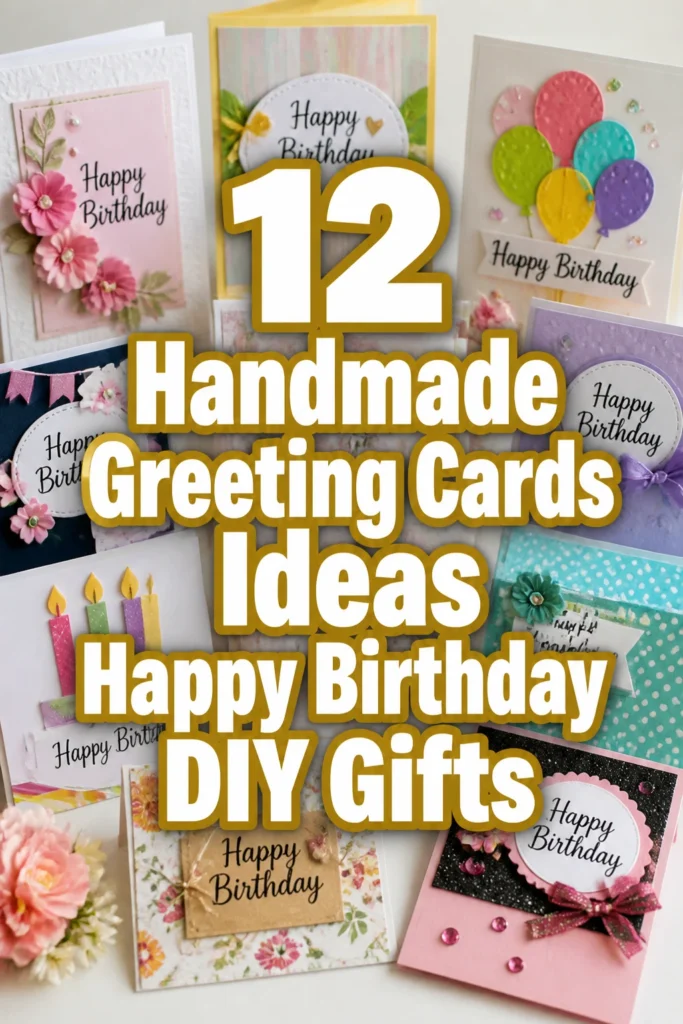
12 Handmade Greeting Cards Ideas Happy Birthday DIY Gifts
Stuck staring at a shelf of generic birthday cards, feeling totally uninspired?
Yeah, we’ve all been there, trying to find something that actually screams “you’re awesome!” instead of “I grabbed this last minute.”
Good news, buttercup. Ditch the boring aisle because we’re diving headfirst into some seriously cool DIY card ideas that are anything but basic.
1. The Quirky Button Art Card
- Best For: Your friend who collects vintage finds.
- Vibe: Playful and textured.
- Why it works: Adds a delightful 3D element that’s surprisingly easy to achieve.
Grab a mix of colorful, mismatched buttons from your craft stash or a thrift store. Lay them out on a sturdy cardstock base in a fun pattern, maybe a balloon cluster or a funky abstract design.
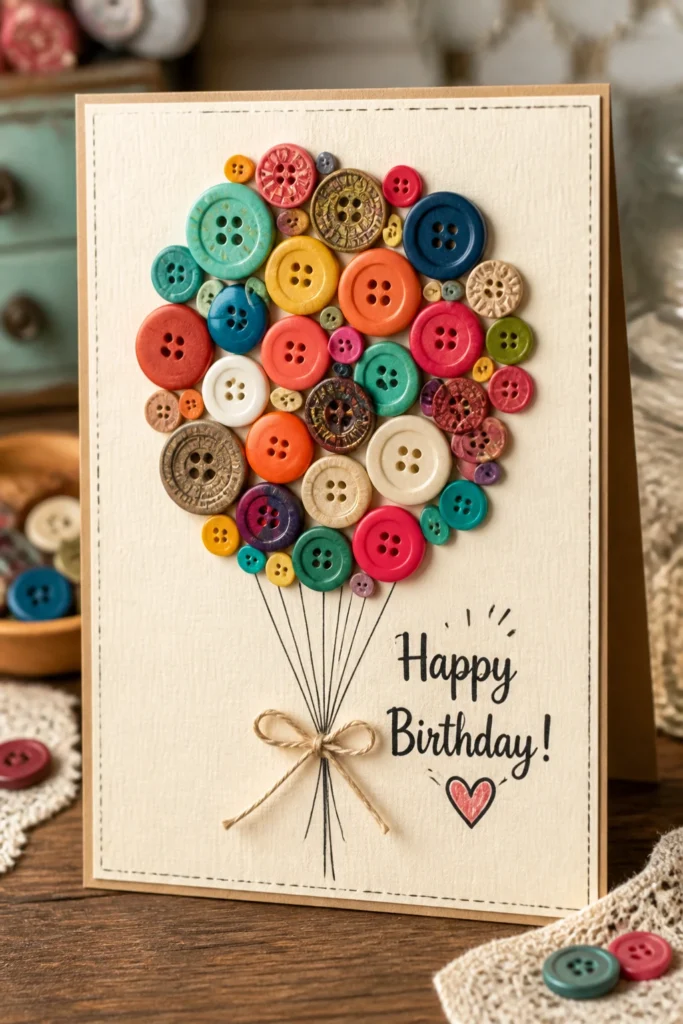
A strong craft glue is your best friend here. Don’t be afraid to mix sizes and colors for maximum visual pop.
Pro Tip: Use a simple pencil sketch underneath to guide your button placement before you commit with glue. Erase any visible lines once dry.
2. Watercolor Wash & Hand-Lettered Card
- Best For: The artsy minimalist in your life.
- Vibe: Serene and personal.
- Why it works: Creates a beautiful, soft background for a heartfelt message.
Start with some quality watercolor paper. Apply a light wash of one or two complementary colors, letting them bleed together for an ethereal effect.
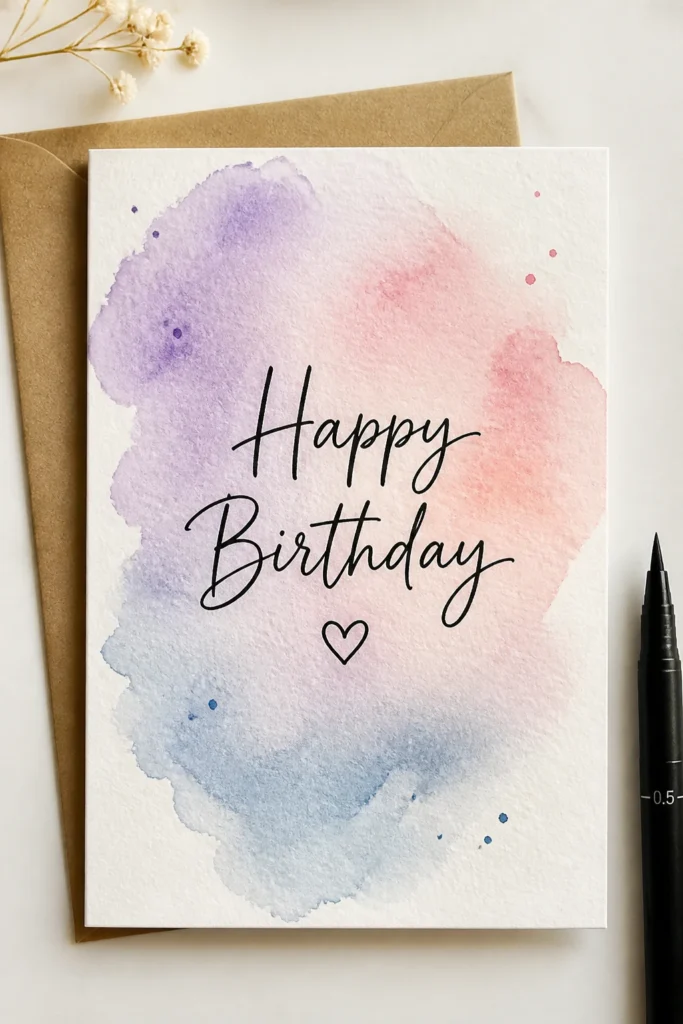
Once completely dry, use a fine-tip black pen or a brush pen to hand-letter a birthday wish. Keep the message short and sweet, letting the background do most of the talking.
Pro Tip: Practice your lettering on a separate piece of paper first. A simple “Happy Birthday” in a clean script often looks best.
3. Pressed Flower Elegance Card
- Best For: Nature lovers and romantics.
- Vibe: Delicate and sophisticated.
- Why it works: Brings the beauty of the outdoors onto a card with timeless charm.
Collect small, flat flowers or leaves and press them between heavy books for a few weeks until dry. Think tiny daisies, fern fronds, or rose petals.
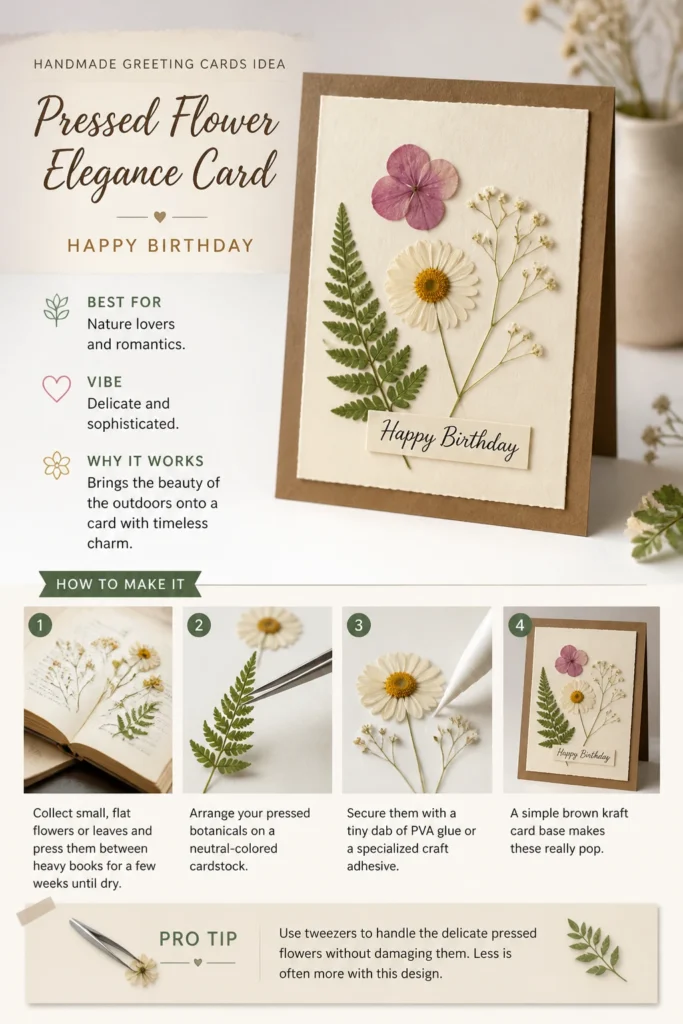
Arrange your pressed botanicals on a neutral-colored cardstock, securing them with a tiny dab of PVA glue or a specialized craft adhesive. A simple brown kraft card base makes these really pop.
Pro Tip: Use tweezers to handle the delicate pressed flowers without damaging them. Less is often more with this design.
4. Washi Tape Geometric Card
- Best For: Your super-trendy, modern pal.
- Vibe: Clean and contemporary.
- Why it works: Effortlessly creates sharp, eye-catching patterns with minimal fuss.
Gather a few rolls of washi tape in coordinating colors or patterns. Choose tapes that offer a good contrast against your card base.
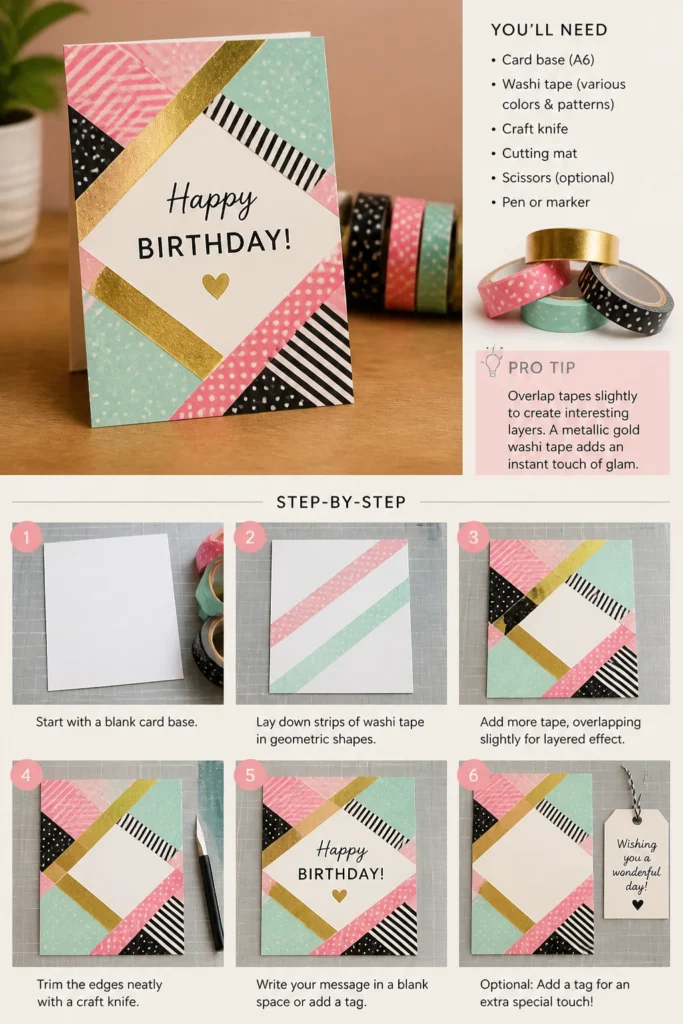
Lay strips of tape across your card in geometric shapes—triangles, stripes, or a mosaic pattern. Trim the edges neatly with a craft knife for a professional finish. You can write your message on a blank space or a separate tag.
Pro Tip: Overlap tapes slightly to create interesting layers. A metallic gold washi tape adds an instant touch of glam.
5. Yarn Pom-Pom Card
- Best For: The friend who loves all things cozy and cute.
- Vibe: Whimsical and tactile.
- Why it works: Adds an adorable, fluffy texture that’s impossible not to love.
Make a few small, fluffy yarn pom-poms in various colors—you can use a fork or a dedicated pom-pom maker. Aim for dime to quarter-sized ones.
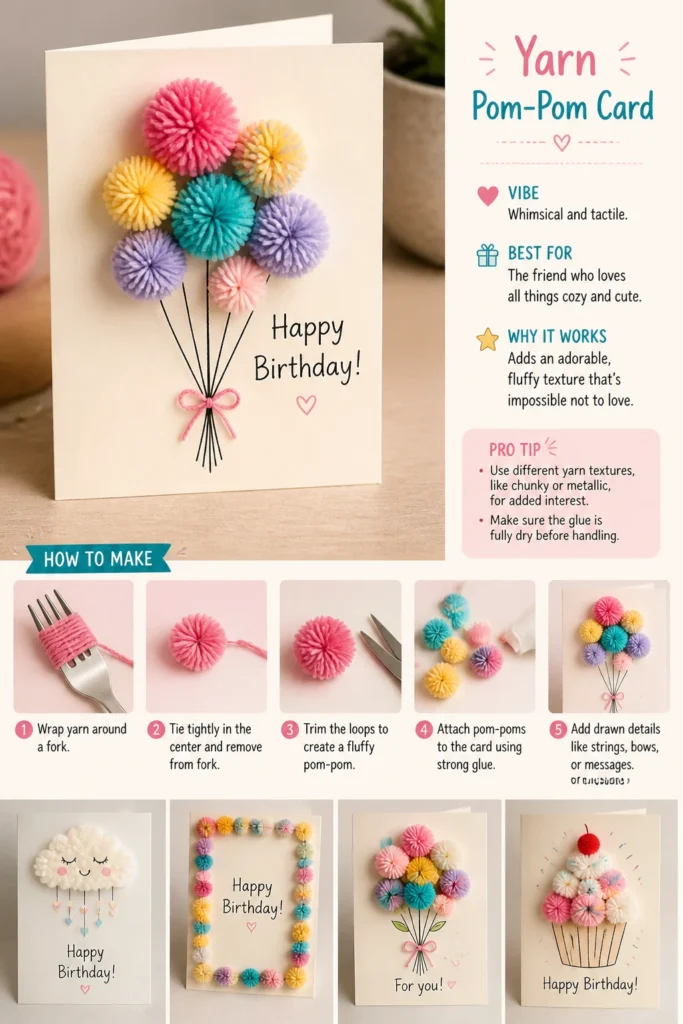
Attach them to the front of your card using a strong liquid glue. Arrange them like balloons, a fluffy cloud, or a playful border. Add a simple drawn string if they are balloons.
Pro Tip: Use different yarn textures, like chunky or metallic, for added interest. Make sure the glue is fully dry before handling.
6. Confetti Shaker Card
- Best For: Anyone who loves a party in an envelope.
- Vibe: Festive and interactive.
- Why it works: It’s a mini celebration that literally shakes up the birthday fun.
Cut a window in the front of your card, then adhere a piece of clear acetate (like from old packaging) behind it. Create a border around the window with foam tape, forming a well.
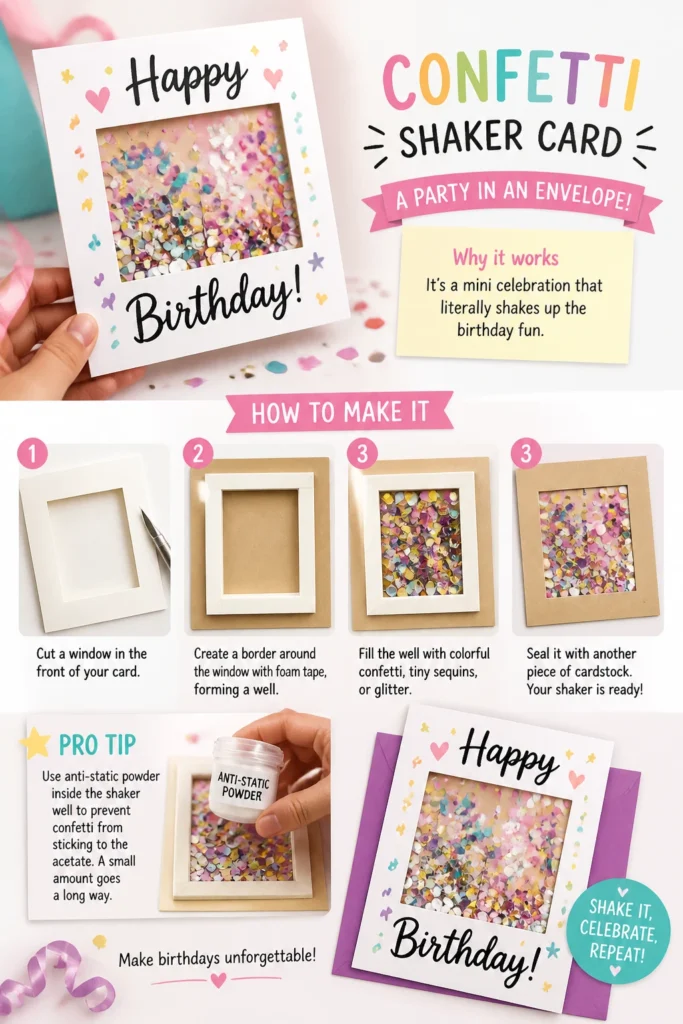
Fill the well with colorful confetti, tiny sequins, or glitter, then seal it with another piece of cardstock. When shaken, the confetti dances around inside the window.
Pro Tip: Use anti-static powder inside the shaker well to prevent confetti from sticking to the acetate. A small amount goes a long way.
7. Stamped & Embossed Card
- Best For: Crafters who appreciate a sophisticated touch.
- Vibe: Elegant and refined.
- Why it works: Creates a raised, glossy effect that feels incredibly luxurious.
Stamp a design onto your cardstock using embossing ink, which stays wet longer. Sprinkle embossing powder over the wet ink, tap off the excess, and then heat it with a heat gun until it melts and becomes raised.
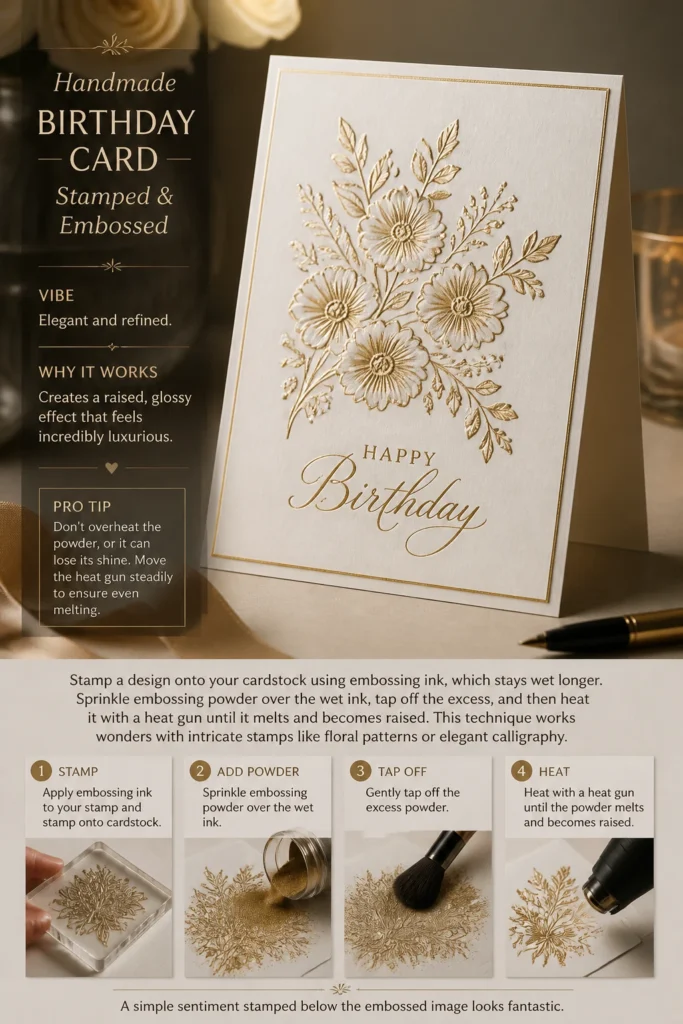
This technique works wonders with intricate stamps like floral patterns or elegant calligraphy. A simple sentiment stamped below the embossed image looks fantastic.
Pro Tip: Don’t overheat the powder, or it can lose its shine. Move the heat gun steadily to ensure even melting.
8. Pop-Up Surprise Card
- Best For: Kids and adults who love a good surprise.
- Vibe: Whimsical and engaging.
- Why it works: Adds an unexpected 3D element that literally jumps out at you.
Cut two parallel slits in the fold of your card, then push the cut-out section inwards to create a pop-up platform. Attach a small image or message to this platform.
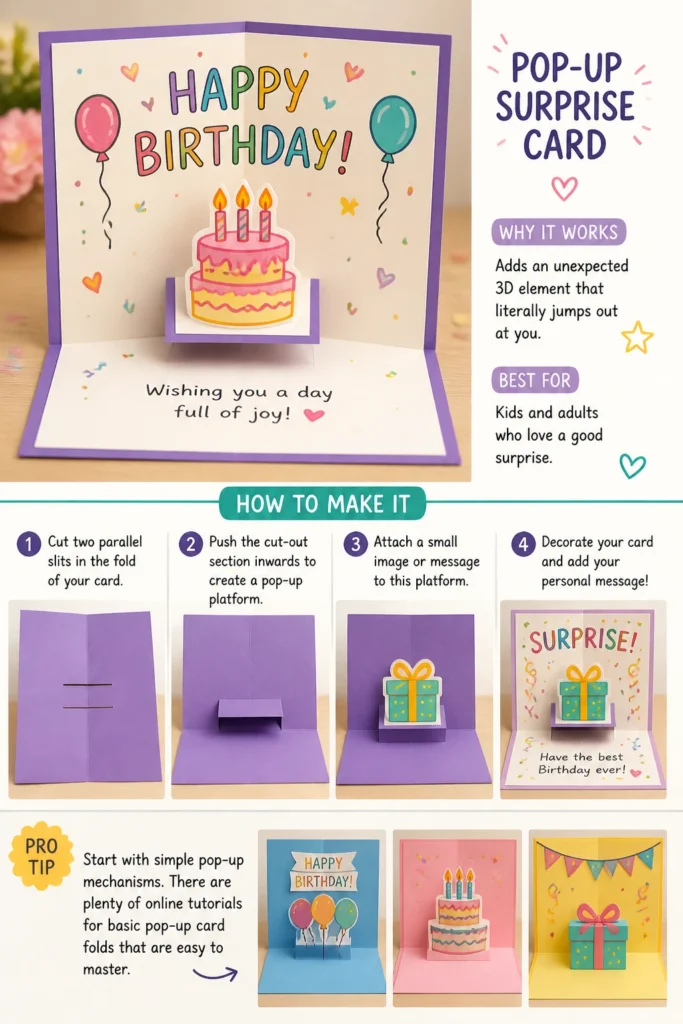
Think a tiny birthday cake, a gift box, or a “Happy Birthday” banner. Use a contrasting color for the pop-up element so it stands out.
Pro Tip: Start with simple pop-up mechanisms. There are plenty of online tutorials for basic pop-up card folds that are easy to master.
9. Yarn Wrapped Letter Card
- Best For: Anyone who loves texture and a personalized touch.
- Vibe: Cozy and artistic.
- Why it works: Creates a soft, dimensional focal point that’s truly unique.
Cut out a large letter (the birthday person’s initial) from thick cardboard or sturdy cardstock. Choose a chunky or colorful yarn.
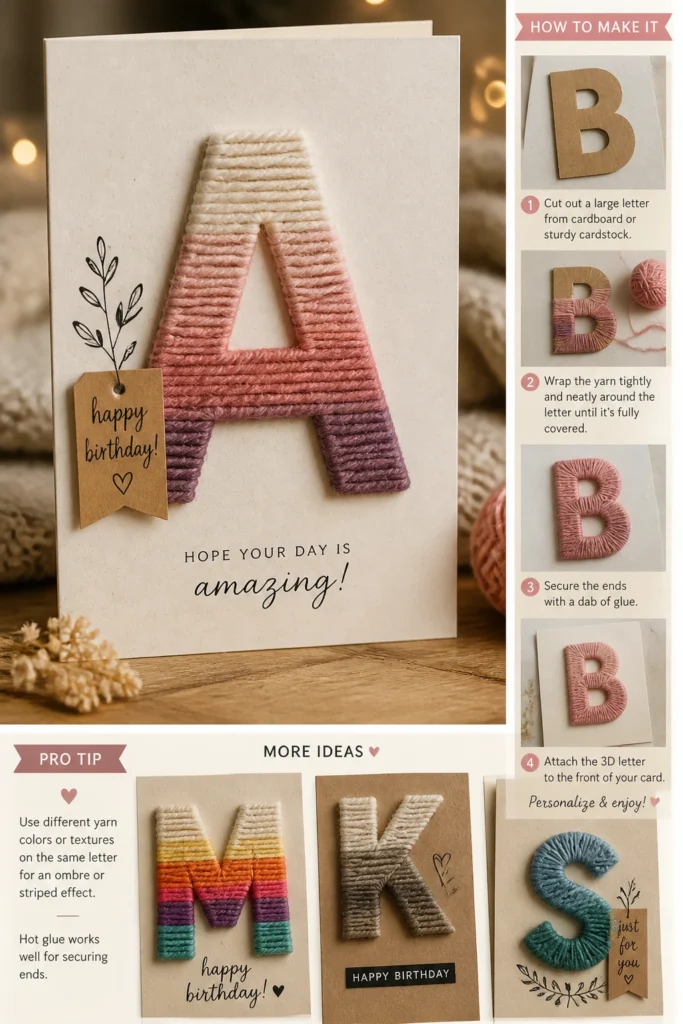
Wrap the yarn tightly and neatly around the letter until it’s completely covered. Secure the ends with a dab of glue. Attach this 3D letter to the front of a simple card.
Pro Tip: Use a few different yarn colors or textures on the same letter for an ombre or striped effect. Hot glue works well for securing ends.
10. Fingerprint Balloon Card
- Best For: A sweet, sentimental gift, especially from kids.
- Vibe: Adorable and personal.
- Why it works: Captures a moment in time and is incredibly charming.
Get some washable craft ink pads in various bright colors. Have the sender (or multiple senders) press their finger into the ink and then onto the card to create “balloons.”
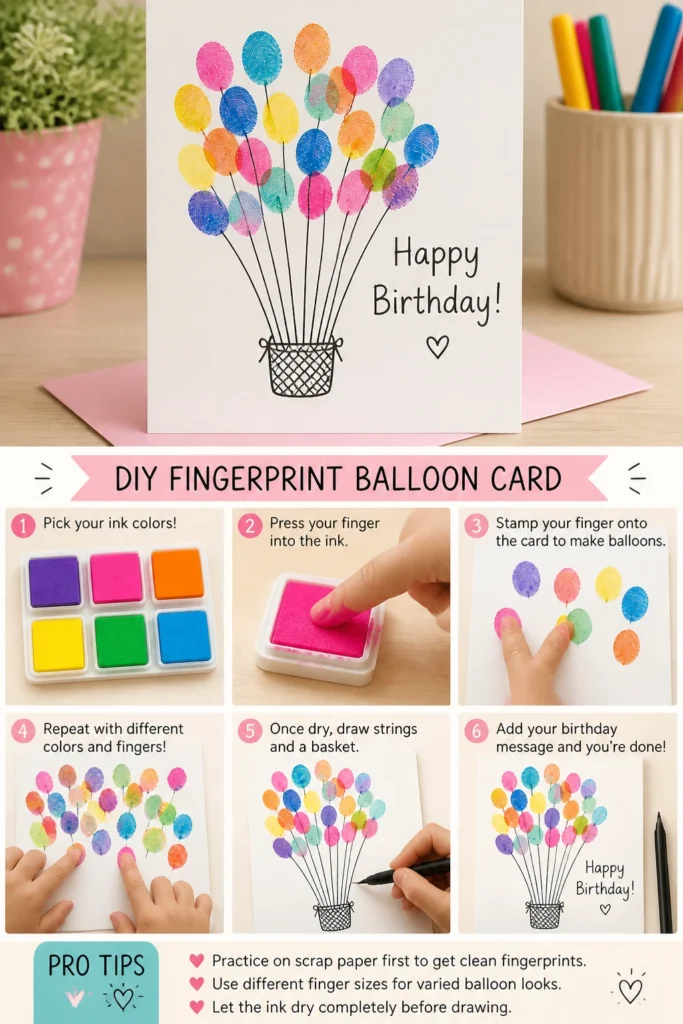
Once the fingerprints are dry, use a fine-tip black pen to draw strings from each “balloon” down to a hand-drawn basket or just floating off the page. Add a simple birthday message.
Pro Tip: Practice on scrap paper first to get clean fingerprints. Use different finger sizes for varied “balloon” looks.
11. Layered Die-Cut Card
- Best For: The friend who appreciates intricate details.
- Vibe: Sophisticated and dimensional.
- Why it works: Adds depth and visual interest through contrasting shapes and colors.
If you have a die-cutting machine (or a very steady hand with an X-Acto knife), cut out several shapes or words from different colored cardstock. Think intricate flowers, a “Happy Birthday” sentiment, or geometric patterns.
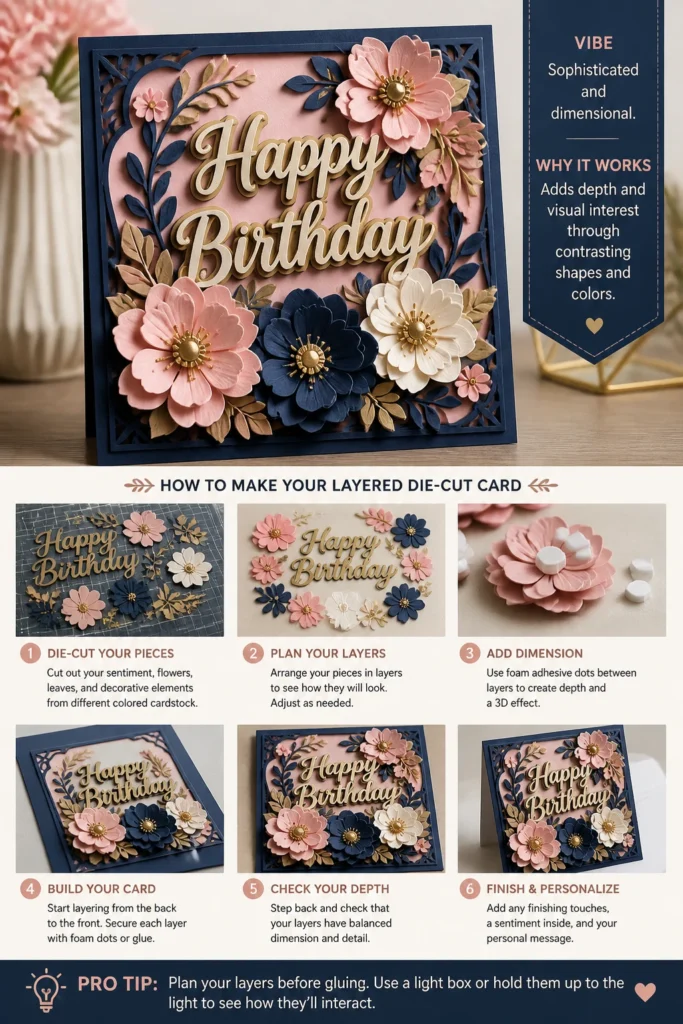
Layer these cut-outs, using foam adhesive dots between layers for a 3D effect. A contrasting background color will make your layered elements pop.
Pro Tip: Plan your layers before gluing. Use a light box or hold them up to the light to see how they’ll interact.
12. Shabby Chic Fabric Scrap Card
- Best For: Your vintage-loving, bohemian friend.
- Vibe: Rustic and charming.
- Why it works: Repurposes materials into a delightfully textured, unique design.
Gather small scraps of fabric—think lace, burlap, floral cottons, or even an old denim patch. Tear them into small pieces rather than cutting for a softer edge.
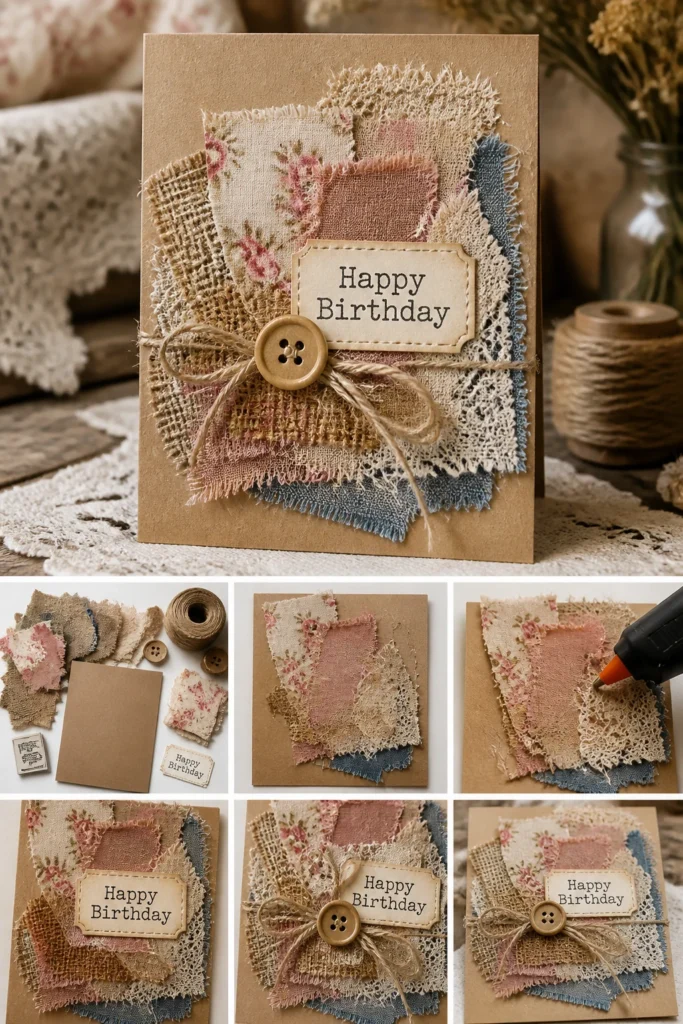
Layer and glue these fabric scraps onto the front of a kraft card base. Add a small button, a piece of twine, or a tiny hand-stamped sentiment on top of the fabric collage. A little fraying is perfectly acceptable.
Pro Tip: Use a strong fabric glue or hot glue for best adhesion. Don’t be afraid to mix different textures and patterns for an eclectic look.
Our Top Recommended Finds
- A good quality craft glue: Essential for securing all those bits and bobs without things falling apart.
- Assorted cardstock pack: Having a variety of colors and weights on hand means you’re always ready for your next big idea.
- Precision craft knife and mat: For those clean cuts and sharp edges that elevate your card from homemade to handmade.
Which of these will you try first?
Honestly, who needs a store-bought card when you can whip up something this cool?
You’re giving a piece of yourself, which, let’s be real, is way more valuable than any mass-produced greeting.
So, which of these brilliant ideas is calling your name for the next birthday bash?