DIY Fairy Garden Ideas Homemade How To Make
I remember the first fairy garden I made with my niece; it was a simple project that sparked pure magic in our afternoon.
Creating your own miniature world is incredibly rewarding, offering a peaceful escape and a touch of whimsy to any space.
This guide shares my practical experience, helping you craft a charming fairy garden that truly feels special and handmade.
Quick Overview
Embark on a delightful journey to construct your very own enchanting fairy garden. You’ll learn how to select the perfect container, arrange natural elements, and add tiny, whimsical details that bring your miniature landscape to life.
By the end, you’ll have a custom-built haven for tiny mythical creatures, ready to display indoors or out.
- Time needed: 4-6 hours (spread over a few days for drying/settling)
- Difficulty: Beginner
- What you’ll need: A container, soil, small plants, natural materials, and miniature accessories.
Step-by-Step Instructions
Step 1: Choose Your Container and Location
The foundation of any great fairy garden is its container and placement. Consider both aesthetics and practicality when making your selection.
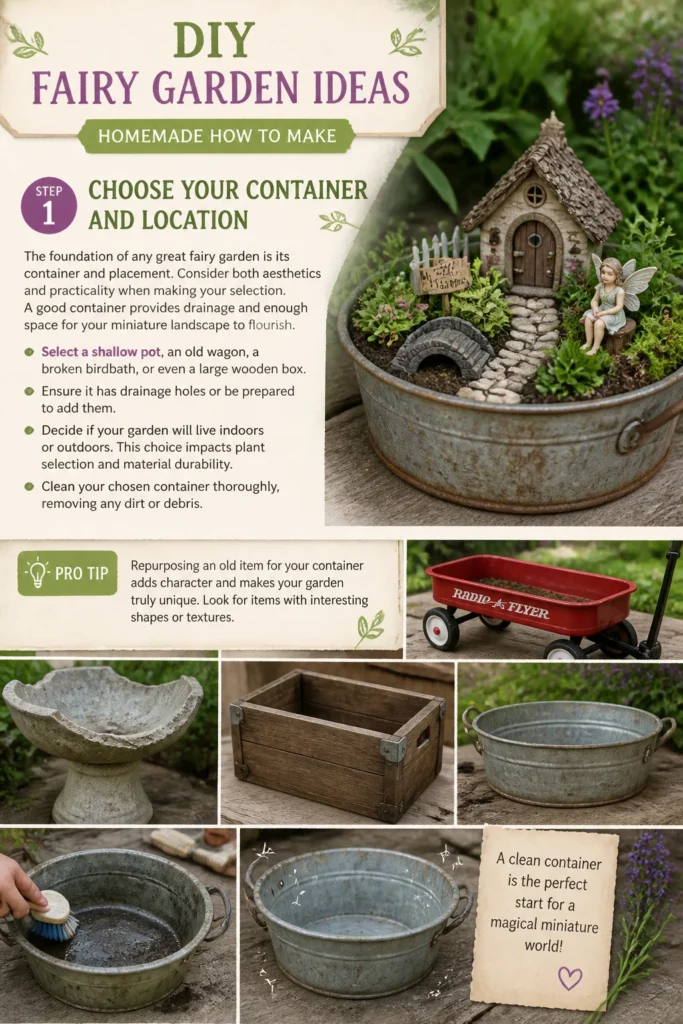
A good container provides drainage and enough space for your miniature landscape to flourish.
- Select a shallow pot, an old wagon, a broken birdbath, or even a large wooden box. Ensure it has drainage holes or be prepared to add them.
- Decide if your garden will live indoors or outdoors. This choice impacts plant selection and material durability.
- Clean your chosen container thoroughly, removing any dirt or debris.
Pro Tip: Repurposing an old item for your container adds character and makes your garden truly unique. Look for items with interesting shapes or textures.
Step 2: Prepare the Drainage and Soil
Proper drainage is crucial for plant health in any potted garden, including your fairy haven. The right soil mix also provides essential nutrients.
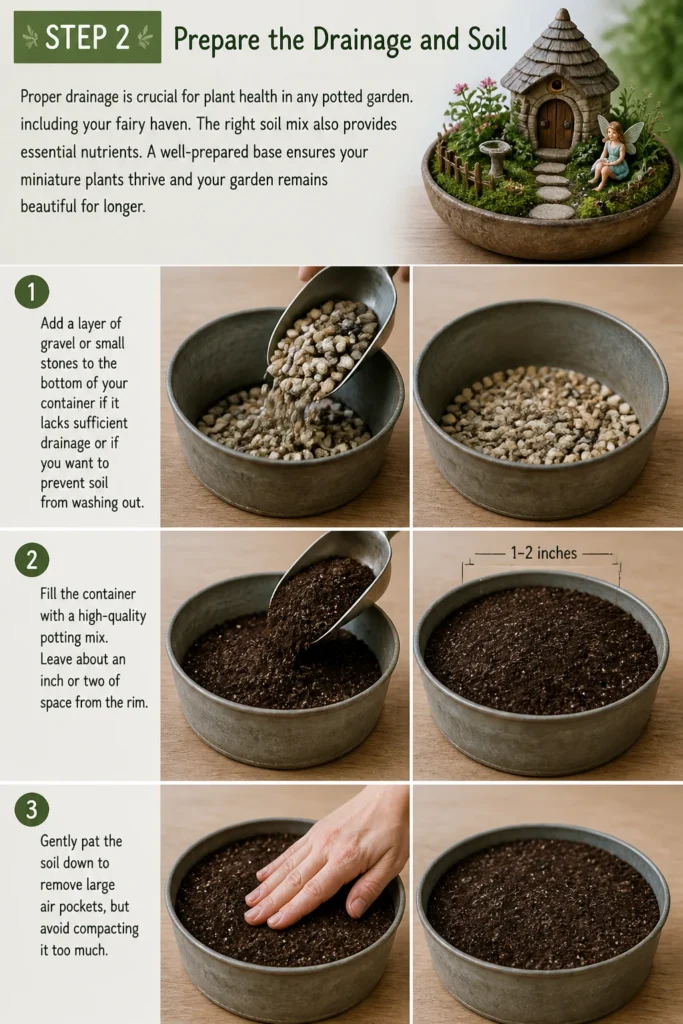
A well-prepared base ensures your miniature plants thrive and your garden remains beautiful for longer.
- Add a layer of gravel or small stones to the bottom of your container if it lacks sufficient drainage or if you want to prevent soil from washing out.
- Fill the container with a high-quality potting mix. Leave about an inch or two of space from the rim.
- Gently pat the soil down to remove large air pockets, but avoid compacting it too much.
Step 3: Select and Plant Miniature Flora
The plants are the living backbone of your fairy garden, providing scale and natural beauty. Choose varieties that stay small and have similar light and water requirements.
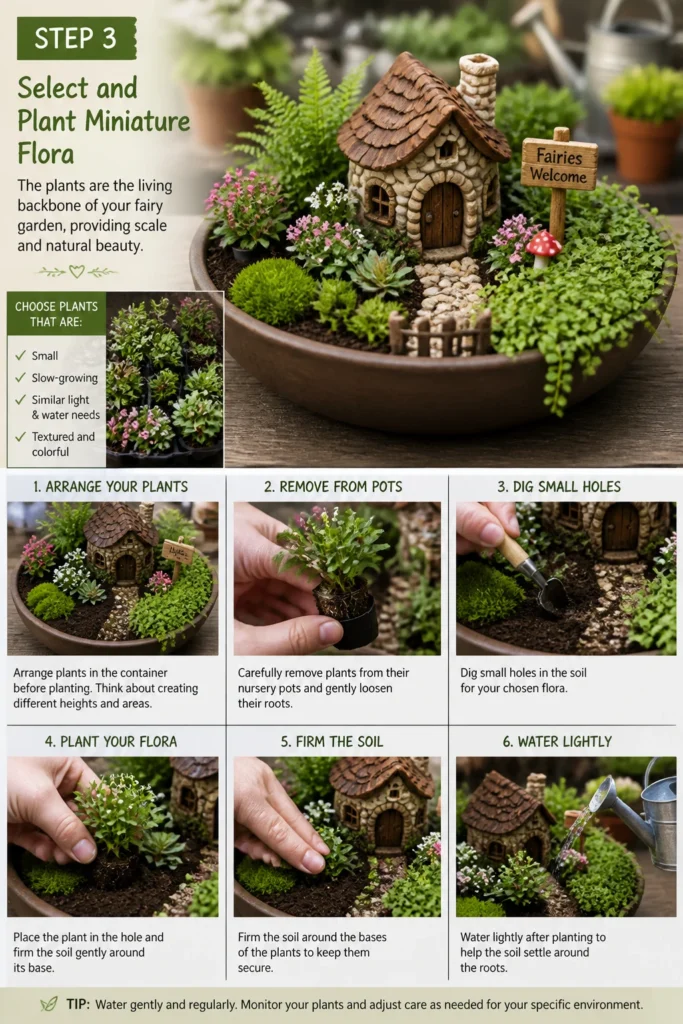
Consider textures and colors to create visual interest within your miniature landscape.
- Research small, slow-growing plants suitable for your climate and chosen location (e.g., succulents, moss, miniature ferns, creeping thyme, small sedums).
- Arrange your plants in the container before planting them. Think about creating different heights and areas.
- Carefully remove plants from their nursery pots and gently loosen their roots.
- Dig small holes and plant your chosen flora, then firm the soil around their bases.
- Water lightly after planting to help the soil settle around the roots.
Step 4: Design Pathways and Landscapes
Pathways invite exploration and define different areas within your fairy garden. Landscape features add depth and a sense of realism to your miniature world.
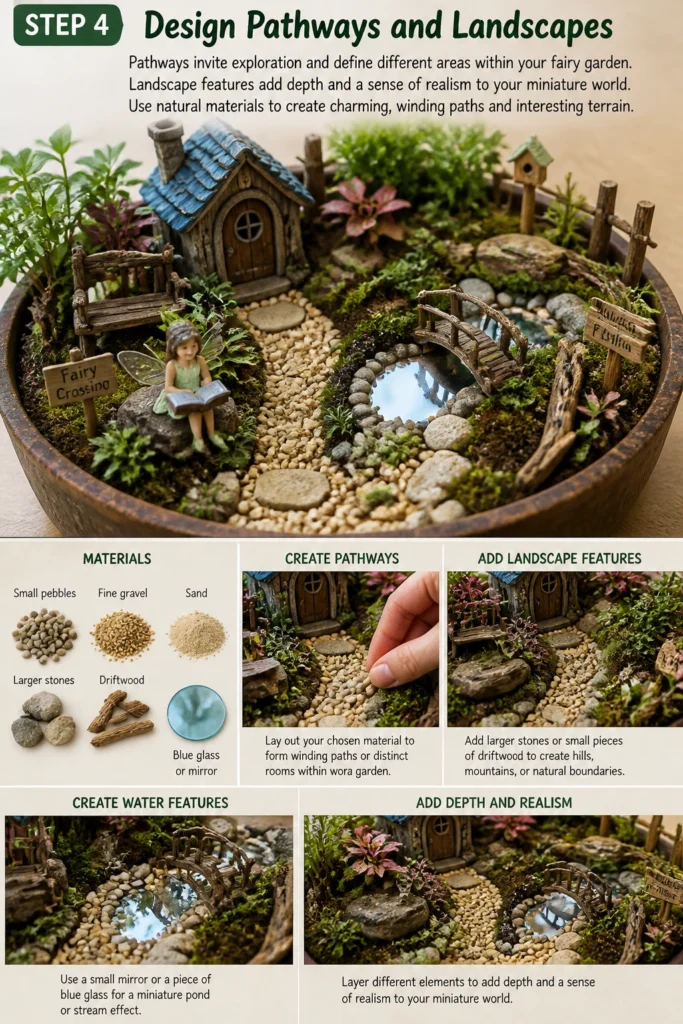
Use natural materials to create charming, winding paths and interesting terrain.
- Gather small pebbles, fine gravel, or sand for pathways.
- Lay out your chosen material to form winding paths or distinct “rooms” within your garden.
- Add larger stones or small pieces of driftwood to create hills, mountains, or natural boundaries.
- Consider a small mirror or a piece of blue glass for a miniature pond or stream effect.
Step 5: Craft Homemade Fairy Furniture and Decor
This is where your creativity truly shines, making your garden unique. Homemade elements add a personal touch that store-bought items simply can’t match.
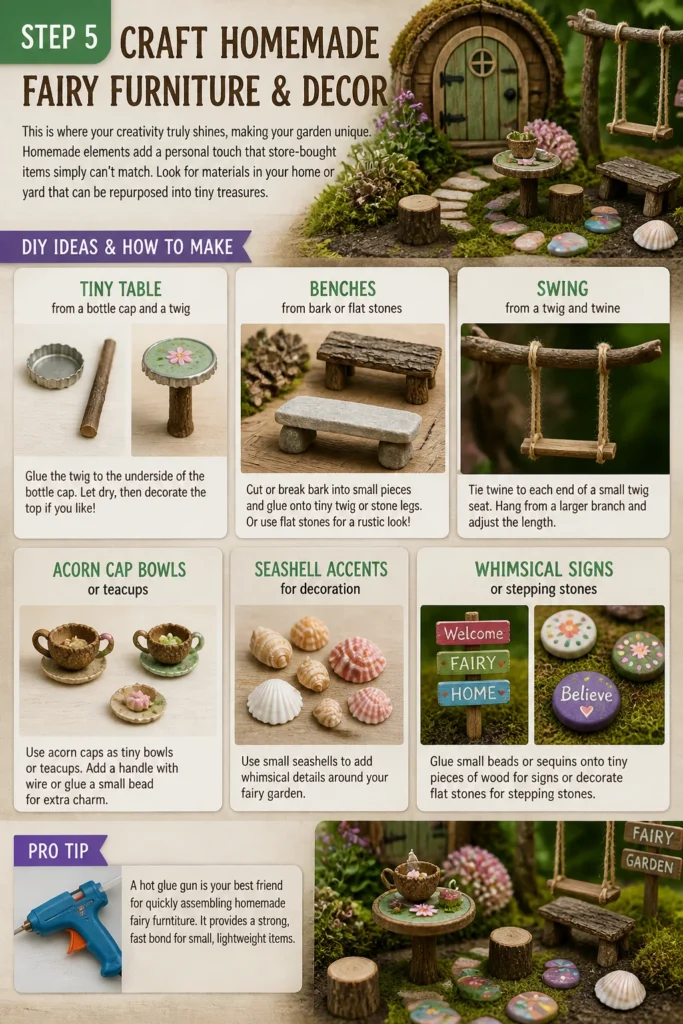
Look for materials in your home or yard that can be repurposed into tiny treasures.
- Make a tiny table from a bottle cap and a twig, glued together.
- Fashion benches from small pieces of bark or flat stones.
- Create a swing from a twig and twine, hung from a larger branch.
- Use acorn caps as bowls or teacups, or small seashells as decorative accents.
- Glue small beads or sequins onto tiny pieces of wood for whimsical signs or stepping stones.
Pro Tip: A hot glue gun is your best friend for quickly assembling homemade fairy furniture. It provides a strong, fast bond for small, lightweight items.
Step 6: Add Whimsical Touches and Fairies
No fairy garden is complete without its magical inhabitants and enchanting details. These final touches bring the whole scene to life.
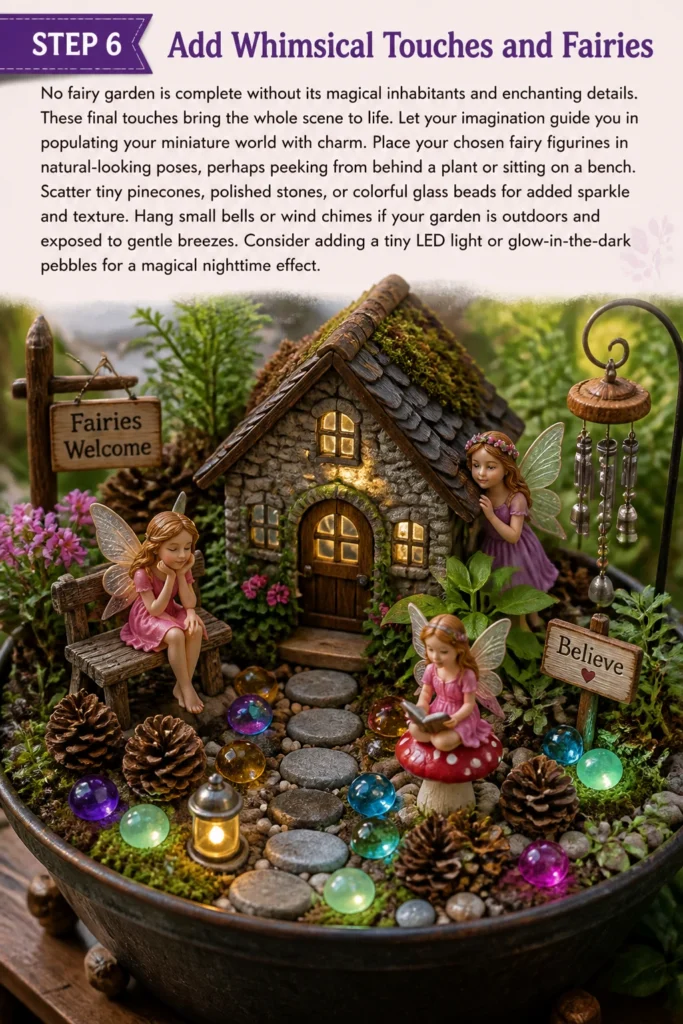
Let your imagination guide you in populating your miniature world with charm.
- Place your chosen fairy figurines in natural-looking poses, perhaps peeking from behind a plant or sitting on a bench.
- Scatter tiny pinecones, polished stones, or colorful glass beads for added sparkle and texture.
- Hang small bells or wind chimes if your garden is outdoors and exposed to gentle breezes.
- Consider adding a tiny LED light or glow-in-the-dark pebbles for a magical nighttime effect.
Step 7: Maintain and Nurture Your Garden
Like any living garden, your fairy garden needs ongoing care to thrive. Regular maintenance keeps it looking fresh and vibrant.
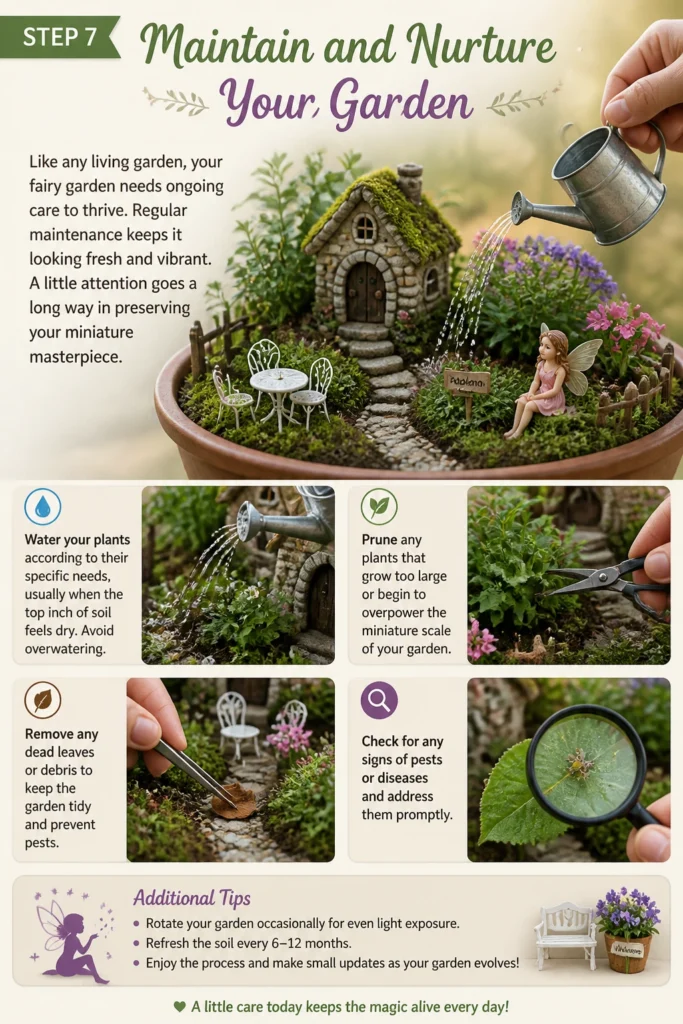
A little attention goes a long way in preserving your miniature masterpiece.
- Water your plants according to their specific needs, usually when the top inch of soil feels dry. Avoid overwatering.
- Prune any plants that grow too large or begin to overpower the miniature scale of your garden.
- Remove any dead leaves or debris to keep the garden tidy and prevent pests.
- Check for any signs of pests or diseases and address them promptly.
Step 8: Evolve and Enjoy Your Creation
Fairy gardens are living art pieces that can change and grow over time. Don’t be afraid to experiment and evolve your design.
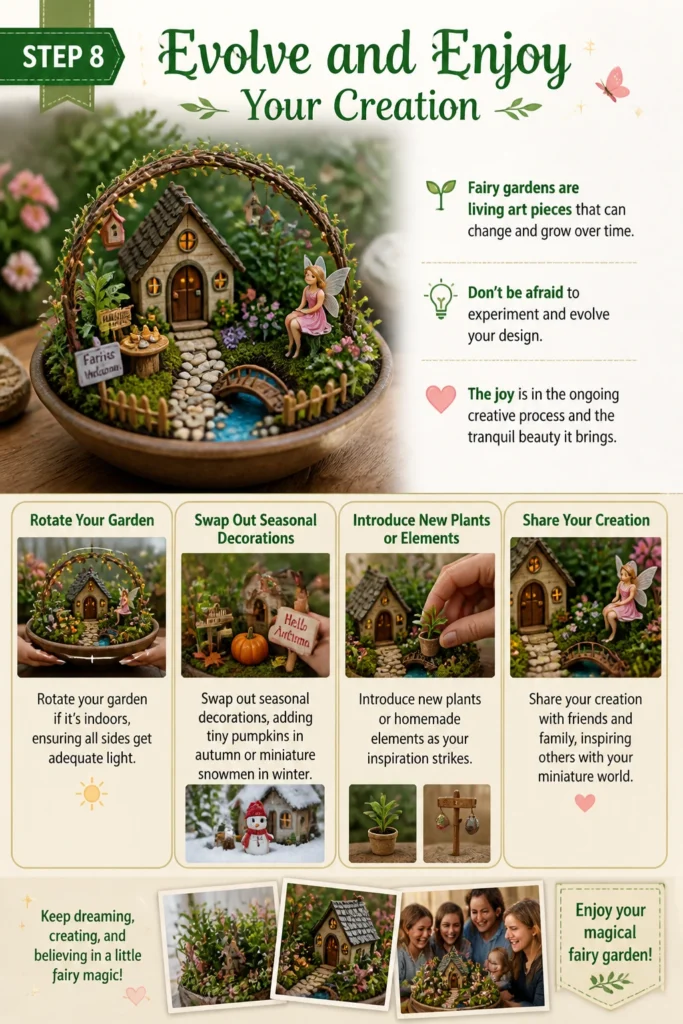
The joy is in the ongoing creative process and the tranquil beauty it brings.
- Rotate your garden if it’s indoors, ensuring all sides get adequate light.
- Swap out seasonal decorations, adding tiny pumpkins in autumn or miniature snowmen in winter.
- Introduce new plants or homemade elements as your inspiration strikes.
- Share your creation with friends and family, inspiring others with your miniature world.
Common Mistakes to Avoid
Overcrowding Your Garden
A common pitfall is trying to fit too many plants or accessories into a small space. This makes the garden look cluttered and can hinder plant growth.
Instead, aim for a balanced, open design with room for each element to breathe and be appreciated. Less is often more in miniature landscaping.
Ignoring Drainage Needs
Failing to provide adequate drainage can quickly lead to root rot and plant death. Many containers, especially decorative ones, lack proper drainage holes.
Always ensure your container has drainage holes or create a substantial gravel layer at the bottom to prevent waterlogging.
Choosing Mismatched Plants
Selecting plants with vastly different light and water requirements will inevitably lead to some plants struggling. One might thrive while another withers.
Group plants that have similar care needs to ensure all your miniature flora can flourish together in harmony.
Using Non-Weatherproof Materials Outdoors
If your fairy garden is destined for the outdoors, using materials that aren’t weather-resistant can lead to rapid deterioration. Fabric, untreated wood, or water-soluble paints will quickly degrade.
Opt for natural materials like stone, treated wood, or plastic figurines, and seal homemade items with waterproof finishes to ensure longevity.
Troubleshooting
Plants Are Wilting or Turning Yellow
This often indicates an issue with watering, either too much or too little. Overwatering can lead to root rot, while underwatering causes dehydration.
Check the soil moisture by feeling it an inch or two down. Adjust your watering schedule based on plant needs and ensure proper drainage in your container.
Algae or Mold Growth on Soil/Decor
Algae or mold usually appears in overly damp conditions with poor air circulation. This can be unsightly and potentially harmful to plants.
Reduce watering frequency, ensure good drainage, and gently remove any visible growth. Improving air circulation by occasionally moving the garden can also help.
Pests Appearing in the Garden
Small insects like gnats or aphids can sometimes find their way into your fairy garden, especially if it’s indoors or near other plants. They can damage your miniature flora.
Identify the pest and treat it with an appropriate organic insecticide or by gently wiping them away with a damp cloth. Isolate affected plants if necessary.
Key Takeaways
- Choose a container with good drainage to support plant health.
- Select miniature plants that share similar light and water requirements.
- Embrace homemade elements to add unique, personal charm to your garden.
- Design pathways and landscapes using natural materials for visual interest.
- Maintain your fairy garden regularly with proper watering and pruning.
- Don’t be afraid to change and evolve your garden’s design over time.
Frequently Asked Questions
Can I use regular garden soil for my fairy garden?
It’s generally better to use a high-quality potting mix specifically designed for containers. Garden soil can be too dense, lacking the proper drainage and aeration needed for potted plants, especially in a shallow fairy garden container.
How often should I water my fairy garden?
Watering frequency depends on your plants, climate, and container. A good rule of thumb is to water when the top inch of soil feels dry to the touch. Always check the soil before watering to avoid over or under-watering.
Where can I find miniature fairy garden accessories?
You can find miniature accessories at craft stores, garden centers, online retailers, or even dollar stores. However, making your own from natural elements like twigs, stones, and acorn caps adds a truly personal and charming touch.
What if my plants start to outgrow the garden?
If your plants become too large, you have a few options. You can prune them back to maintain their miniature size, transplant them to a larger pot, or replace them with smaller, slower-growing varieties. This is part of the garden’s natural evolution.
Our Top Recommended Finds
- Miniature Succulent Assortment: Perfect for a low-maintenance, drought-tolerant fairy garden, offering a variety of shapes and textures.
- Fine Gravel or Decorative Pebbles: Essential for creating realistic pathways, rivers, or ground cover, adding texture and definition.
- All-Purpose Potting Mix with Drainage: A high-quality soil blend provides the ideal environment for your miniature plants to thrive, ensuring good aeration and moisture retention.
Your Miniature World Awaits
Creating a DIY fairy garden is more than just a craft project; it’s an invitation to cultivate a small corner of magic in your life.
You’ve learned the steps, gathered the inspiration, and now it’s time to let your imagination take root.
Don’t hesitate any longer. Gather your materials today and begin the delightful process of building your very own enchanting fairy realm.