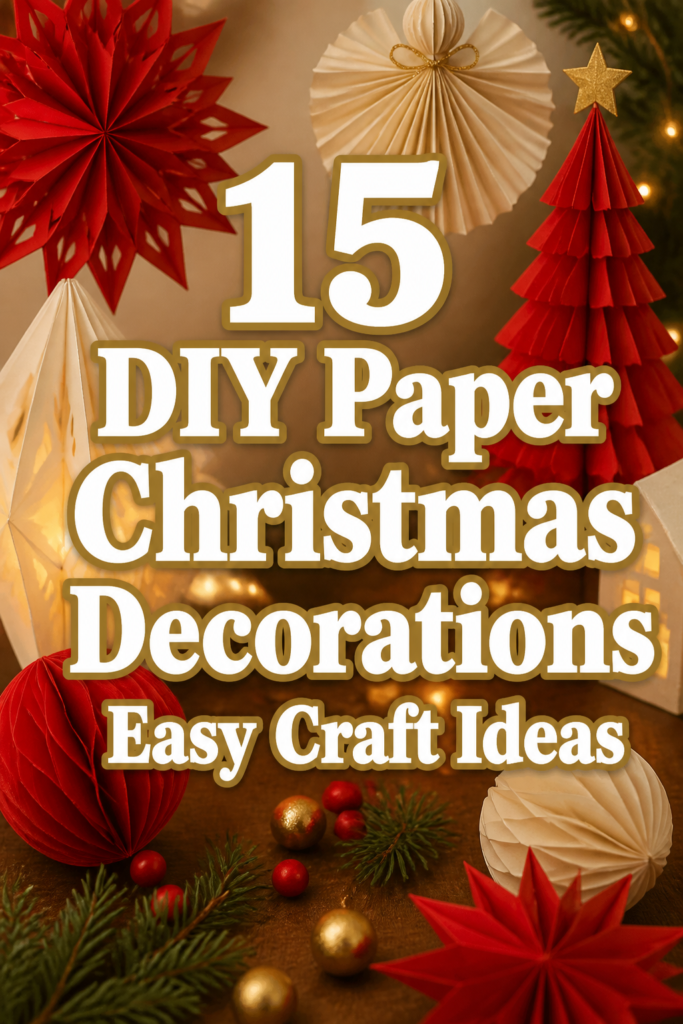
15 DIY Paper Christmas Decorations Easy Craft Ideas
Feeling that holiday pinch already, both on your wallet and your sanity trying to find unique decor?
Yeah, we’ve all been there, staring at those pricey ornaments thinking, “I could totally make that… probably.”
Good news, buttercup, because we’re diving headfirst into some seriously chic and easy paper craft ideas that will make your home look festive without breaking the bank or your spirit.
1. Paper Star Garlands
- Best For: Apartment dwellers, kids’ rooms, mantelpiece magic
- Vibe: Whimsical, Scandi-chic
- Why it works: They are super light, easy to customize, and look impressive strung across a wall.
Grab some sturdy cardstock in varying shades of white, silver, and muted blues. Cut out different sized stars, then stitch them together with a sewing machine or simply glue them onto a long piece of twine.
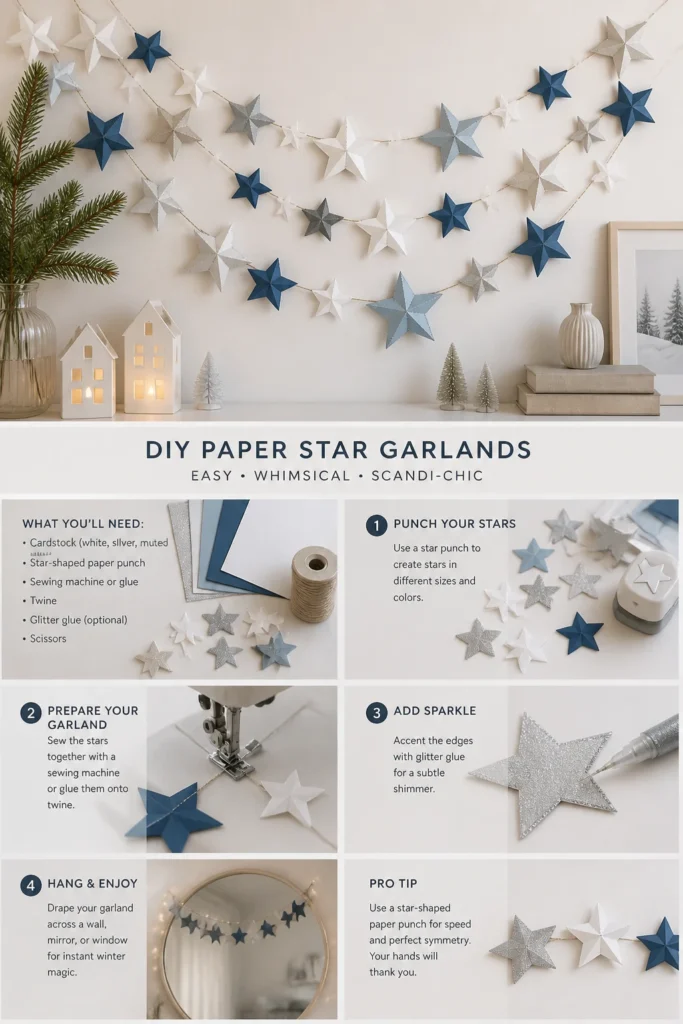
Think less “kindergarten project” and more “winter wonderland elegance.” You can even add a touch of glitter glue to the edges for extra sparkle without the full-on glitter explosion. These look particularly charming draped over a mirror or window frame.
Pro Tip: Use a star-shaped paper punch for speed and perfect symmetry. Your hands will thank you.
2. Geometric Paper Ornaments
- Best For: Modern aesthetics, minimalist trees
- Vibe: Contemporary, sophisticated
- Why it works: They offer a clean, architectural look with surprisingly simple folds.
Think origami-inspired shapes like dodecahedrons or simple faceted balls. You just need a template (tons online, just print and cut), some nice heavy paper, and a glue stick.
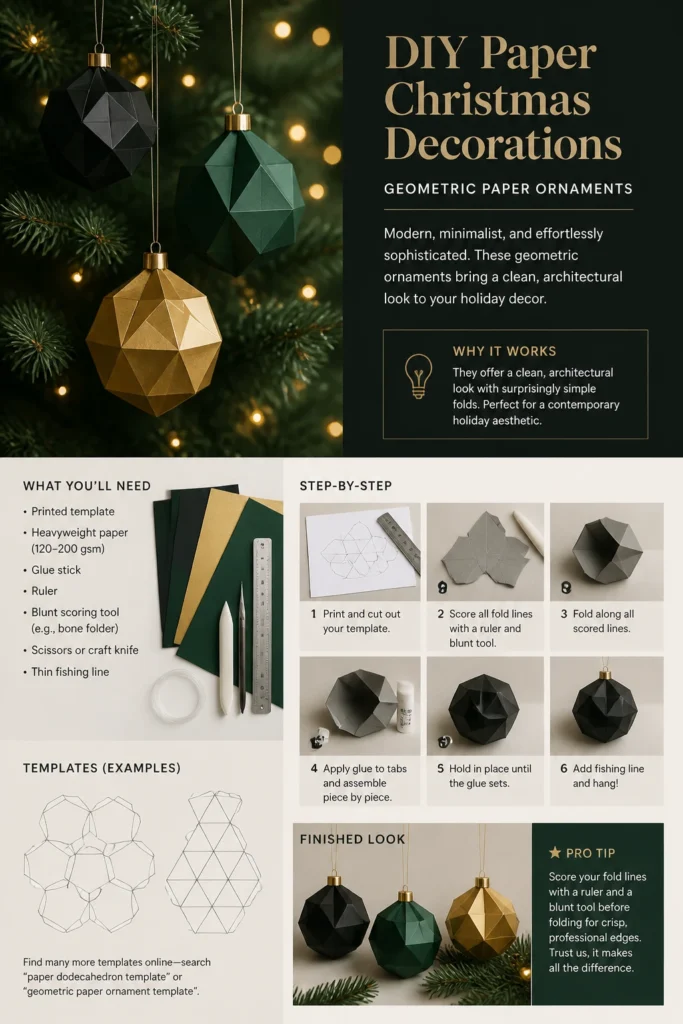
Go for matte black, deep forest green, or even a metallic gold paper for that high-end look. Hang them with thin fishing line for a floating effect on your tree.
Pro Tip: Score your fold lines with a ruler and a blunt tool before folding for crisp, professional edges. Trust us, it makes all the difference.
3. Paper Snowflake Mobiles
- Best For: Entryways, nurseries, quiet corners
- Vibe: Ethereal, dreamy
- Why it works: They create a beautiful, delicate cascade that catches the light.
Remember making paper snowflakes as a kid? Time to level up. Cut out a variety of intricate snowflakes from different weights of white paper.
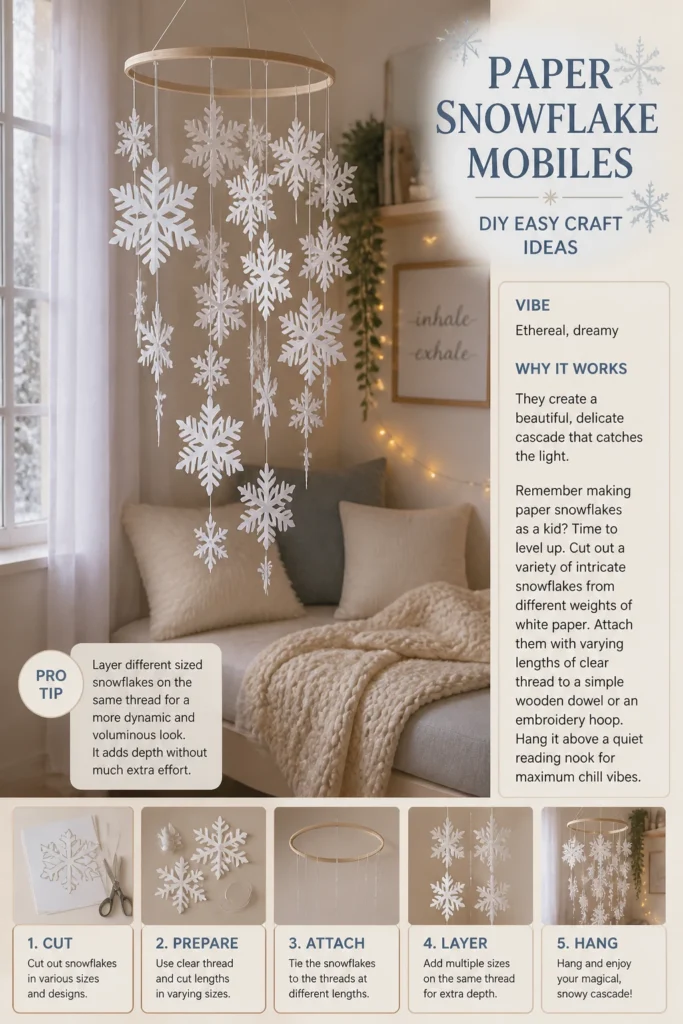
Attach them with varying lengths of clear thread to a simple wooden dowel or an embroidery hoop. Hang it above a quiet reading nook for maximum chill vibes.
Pro Tip: Layer different sized snowflakes on the same thread for a more dynamic and voluminous look. It adds depth without much extra effort.
4. Rolled Paper Trees
- Best For: Tabletop decor, office desks, minimalist mantelpieces
- Vibe: Sculptural, rustic modern
- Why it works: They are surprisingly sturdy and offer a unique texture.
Cut strips of paper, maybe 1/2 inch wide, from old book pages, sheet music, or even colored construction paper in greens and browns. Roll them tightly around a pencil, then glue the end to secure the coil.
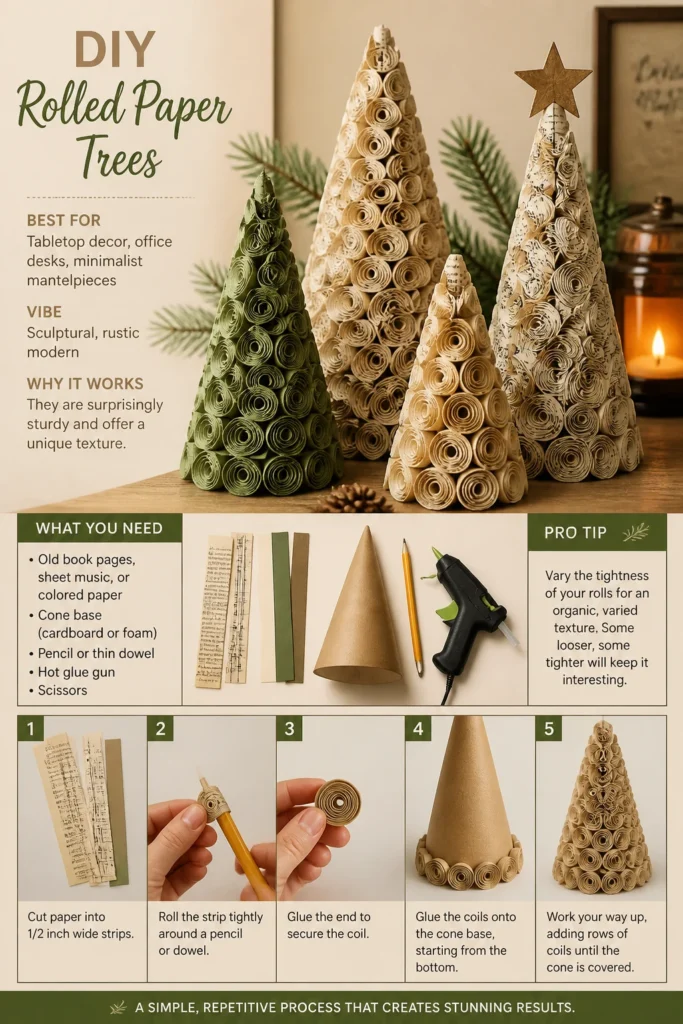
Glue these coils onto a simple cone base, starting from the bottom and working your way up. It’s a bit repetitive, but the end result is totally worth the finger cramps.
Pro Tip: Vary the tightness of your rolls for an organic, varied texture. Some looser, some tighter will keep it interesting.
5. Paper Chain Backdrops
- Best For: Party decor, photo booths, accent walls
- Vibe: Playful, nostalgic
- Why it works: They are quick, inexpensive, and make a huge visual impact.
This is the OG paper craft, but we’re making it chic. Cut strips of paper (think metallic gold, deep red, or even patterned scrapbook paper) about 1 inch wide and 8-10 inches long.
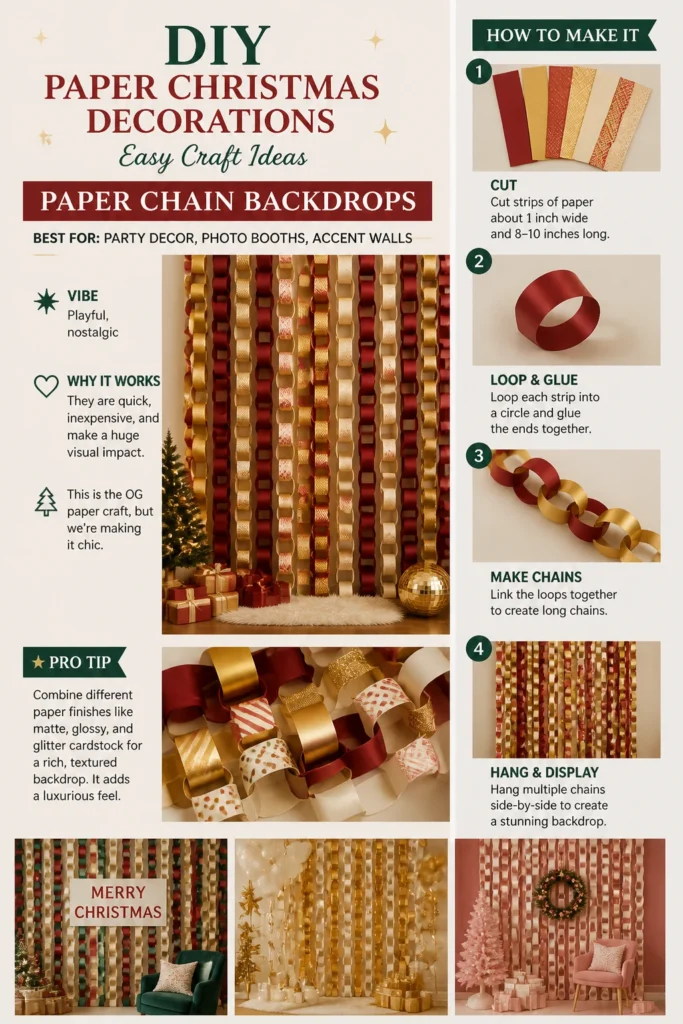
Loop and glue them into chains, then hang multiple chains side-by-side to create a stunning backdrop. It’s like a paper curtain, but way cooler.
Pro Tip: Combine different paper finishes like matte, glossy, and glitter cardstock for a rich, textured backdrop. It adds a luxurious feel.
6. 3D Paper Baubles
- Best For: Tree ornaments, gift toppers, window decorations
- Vibe: Classic, festive
- Why it works: They add volume and dimension to your decor.
Cut out multiple identical shapes—circles, ovals, or even simple teardrops—from colored paper. Fold each shape in half, then glue the halves together, creating a 3D effect.
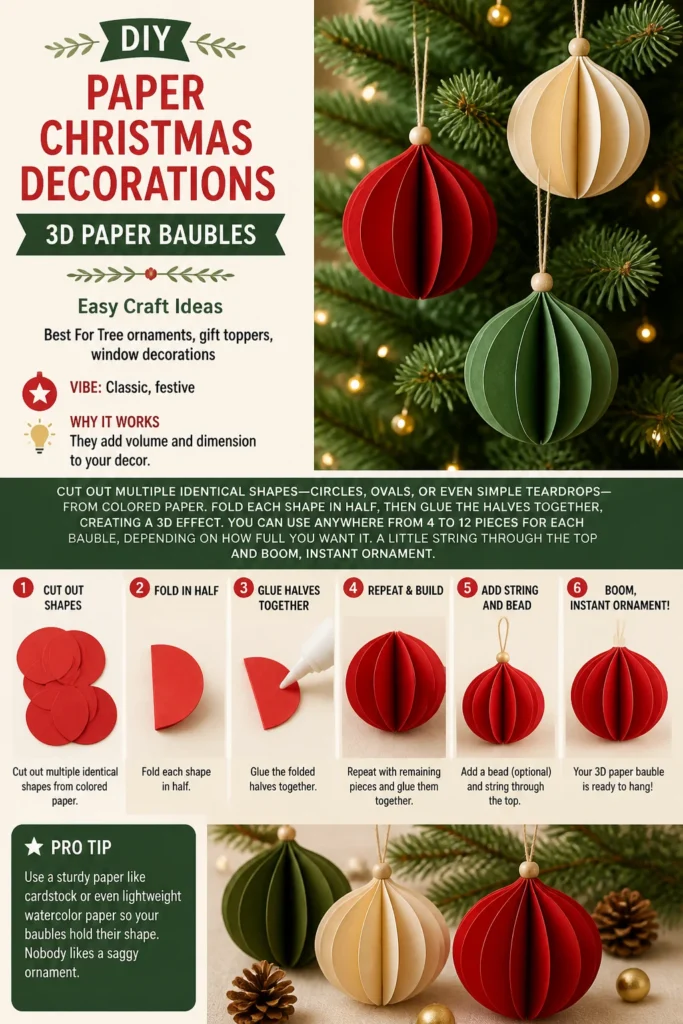
You can use anywhere from 4 to 12 pieces for each bauble, depending on how full you want it. A little string through the top and boom, instant ornament.
Pro Tip: Use a sturdy paper like cardstock or even lightweight watercolor paper so your baubles hold their shape. Nobody likes a saggy ornament.
7. Paper Poinsettia Wreath
- Best For: Front doors, wall decor, festive focal points
- Vibe: Traditional, elegant
- Why it works: It’s a classic Christmas flower made everlasting (and allergy-free).
Cut out various sizes of petal shapes from red and green paper. Layer them, curling the edges slightly with a pencil, to form realistic-looking poinsettias.
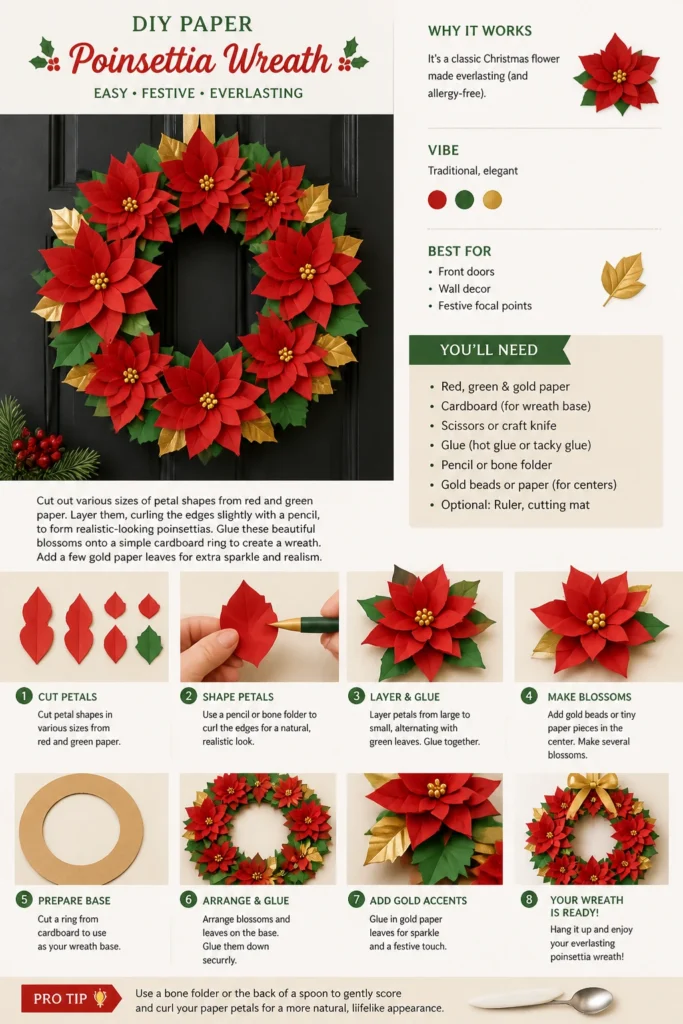
Glue these beautiful blossoms onto a simple cardboard ring to create a wreath. Add a few gold paper leaves for extra sparkle and realism. Just try not to water it.
Pro Tip: Use a bone folder or the back of a spoon to gently score and curl your paper petals for a more natural, lifelike appearance.
8. Mini Paper Lanterns
- Best For: String lights enhancement, table centerpieces
- Vibe: Cozy, warm glow
- Why it works: They diffuse light beautifully and add a soft ambiance.
These are super simple: take rectangular pieces of paper (patterned or solid, your choice), fold them in half lengthwise, and make cuts from the folded edge almost to the open edge.
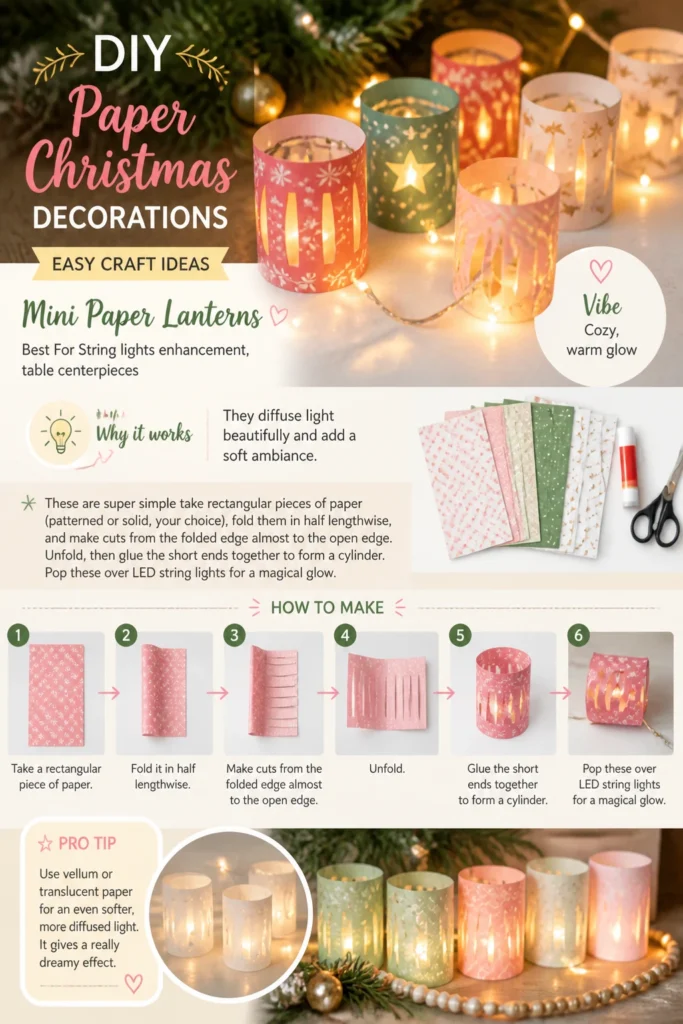
Unfold, then glue the short ends together to form a cylinder. Pop these over LED string lights for a magical glow. Just make sure to use LED lights to avoid any heat issues.
Pro Tip: Use vellum or translucent paper for an even softer, more diffused light. It gives a really dreamy effect.
9. Paper Angel Ornaments
- Best For: Tree toppers, mantel decor, thoughtful gifts
- Vibe: Classic, angelic
- Why it works: They bring a touch of traditional charm and innocence.
Grab some pretty white or cream paper, maybe with a subtle texture. Cut out a simple cone for the body and two wing shapes.
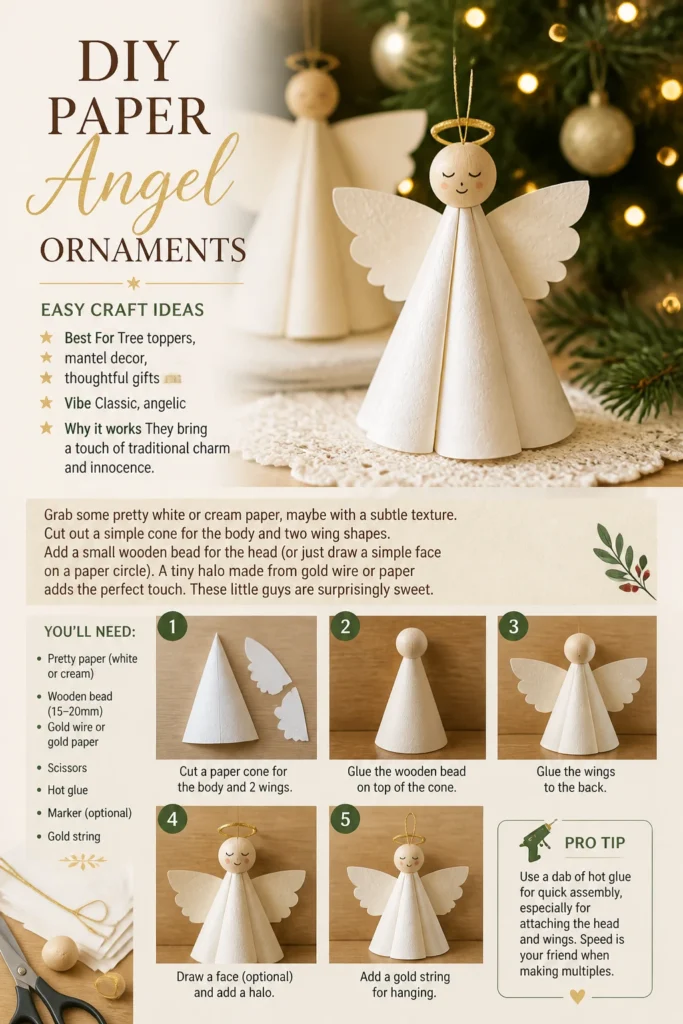
Add a small wooden bead for the head (or just draw a simple face on a paper circle). A tiny halo made from gold wire or paper adds the perfect touch. These little guys are surprisingly sweet.
Pro Tip: Use a dab of hot glue for quick assembly, especially for attaching the head and wings. Speed is your friend when making multiples.
10. Paper Candy Cane Swirls
- Best For: Tree branches, gift bows, garland fillers
- Vibe: Playful, sweet
- Why it works: They are super easy, add a pop of color, and look delightfully festive.
Cut long strips of red and white paper, about half an inch wide. Glue one red strip and one white strip together at one end.
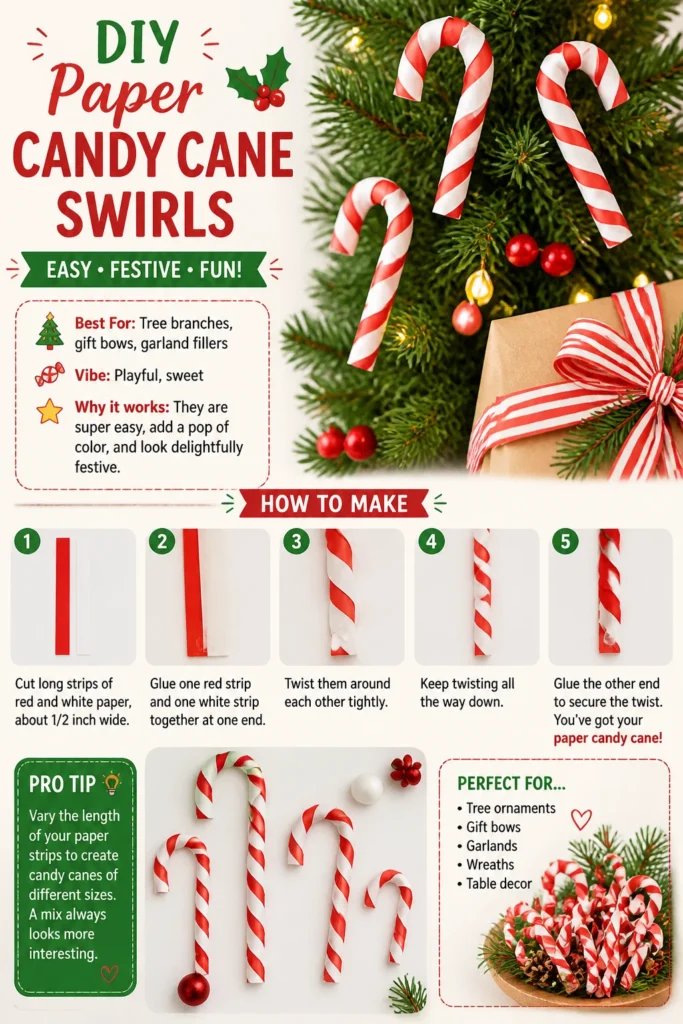
Then, simply twist them around each other tightly, gluing the other end to secure the twist. You’ve got yourself a paper candy cane. They look surprisingly convincing.
Pro Tip: Vary the length of your paper strips to create candy canes of different sizes. A mix always looks more interesting.
11. Star-Folded Book Page Ornaments
- Best For: Rustic themes, literary lovers, upcycling projects
- Vibe: Vintage, cozy
- Why it works: They give old books new life and add a unique texture.
Rescue some yellowed pages from an old, unloved book (thrift stores are your friend here). Fold them into simple star shapes—there are many tutorials for 3D paper stars.
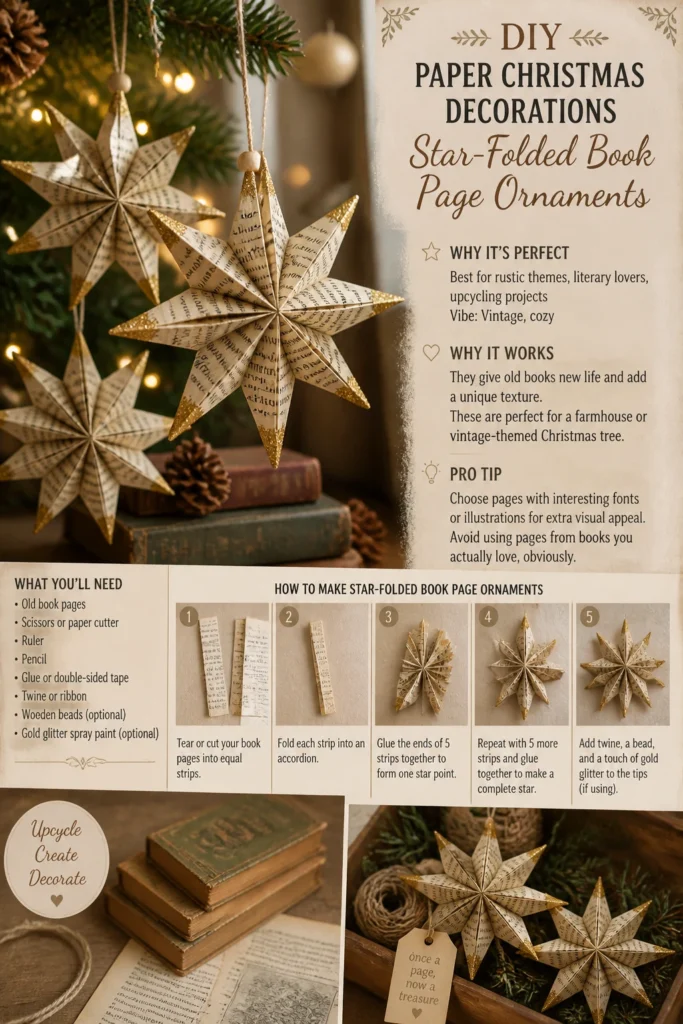
You can even spray a little gold glitter spray paint on the tips for a subtle shimmer. These are perfect for a farmhouse or vintage-themed Christmas tree.
Pro Tip: Choose pages with interesting fonts or illustrations for extra visual appeal. Avoid using pages from books you actually love, obviously.
12. Origami Cranes with Christmas Hats
- Best For: Unique tree ornaments, mantelpiece decor, thoughtful gifts
- Vibe: Quirky, artistic
- Why it works: They’re unexpected and add a touch of playful charm.
Fold some classic origami cranes from festive paper—think deep reds, greens, or even metallic silver. Then, the fun part: give them tiny Santa hats.
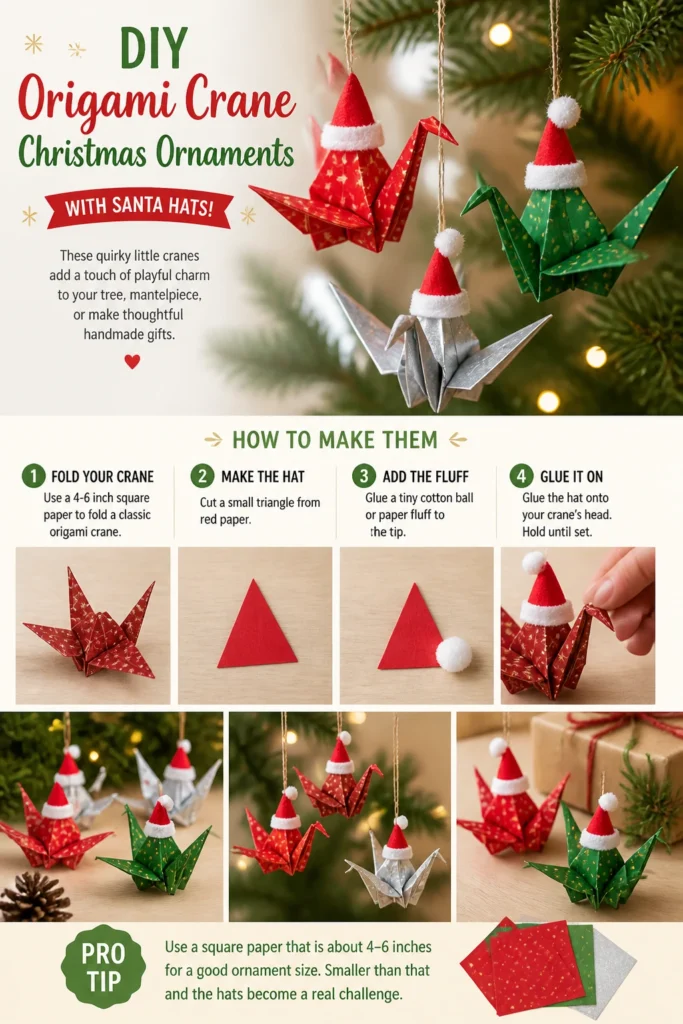
Cut small triangles from red paper and add a tiny white cotton ball or paper fluff to the tip. Glue them onto the cranes’ heads. It’s adorably ridiculous, in the best way.
Pro Tip: Use a square paper for your cranes that is about 4-6 inches for a good ornament size. Smaller than that and the hats become a real challenge.
13. Paper Cone Gnomes
- Best For: Shelf sitters, windowsill decor, kids’ room fun
- Vibe: Whimsical, folklore-inspired
- Why it works: They are incredibly cute and simple to make, bringing a touch of Nordic charm.
Roll a piece of patterned paper into a cone for the body. Add a fluffy white beard made from cotton balls or white craft fur scraps.
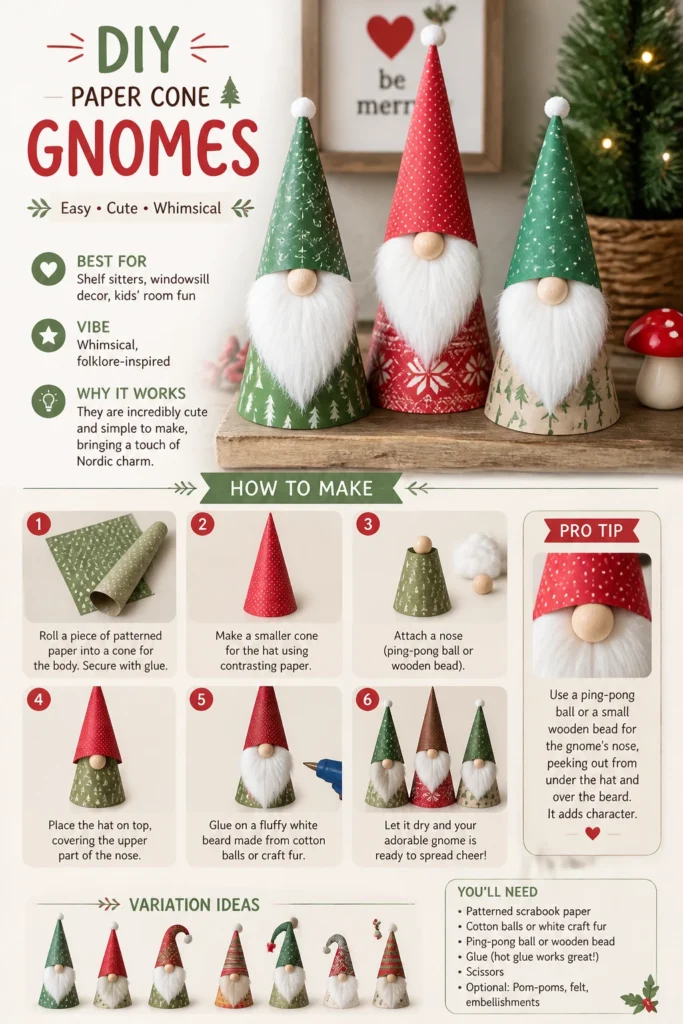
Top it off with a smaller cone hat in a contrasting color, maybe a bright red or green. These little guys are impossible not to smile at, and they stand up on their own.
Pro Tip: Use a ping-pong ball or a small wooden bead for the gnome’s nose, peeking out from under the hat and over the beard. It adds character.
14. Paper Holly and Berry Sprigs
- Best For: Gift wrapping accents, napkin rings, garland embellishments
- Vibe: Classic, natural
- Why it works: They’re a traditional motif that adds instant festive flair to anything.
Cut out classic holly leaf shapes from green cardstock. You can even use a green marker to draw veins for extra detail. Then, punch out small circles from red paper for the berries.
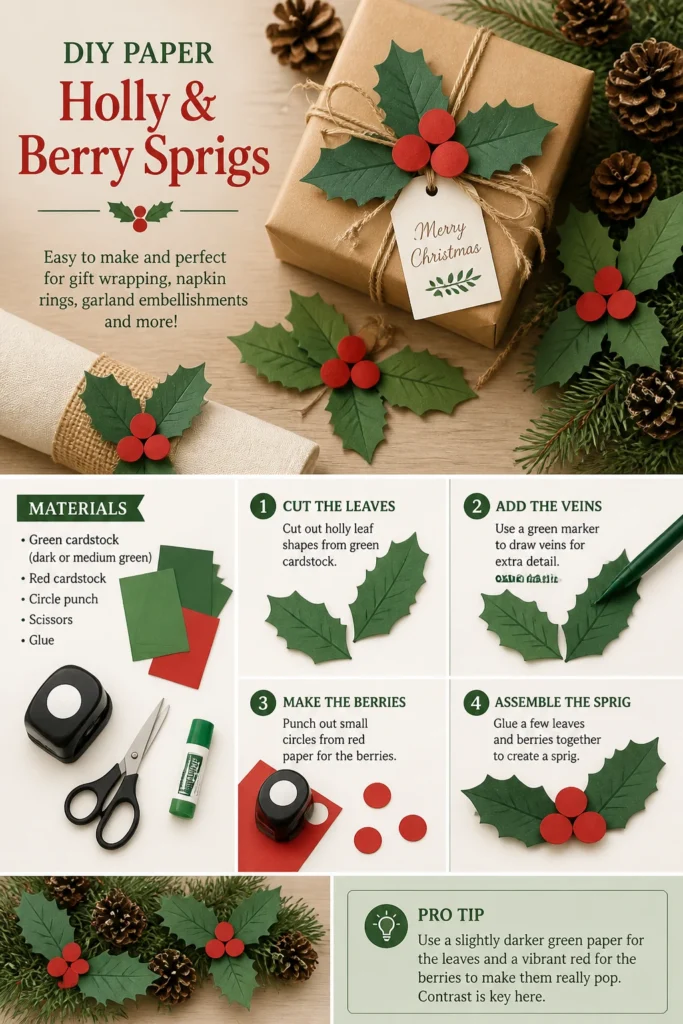
Glue a few leaves and berries together to create a sprig. Attach them to gifts, use them as place settings, or tuck them into your existing garland for a handmade touch.
Pro Tip: Use a slightly darker green paper for the leaves and a vibrant red for the berries to make them really pop. Contrast is key here.
15. Himmeli-Inspired Paper Straw Ornaments
- Best For: Minimalist trees, geometric decor, modern spaces
- Vibe: Scandinavian, clean, architectural
- Why it works: They create beautiful, airy shapes that are surprisingly sturdy.
This one’s a bit more advanced but still super doable. Cut paper straws (or even thin paper tubes) into various lengths. Thread them together with needle and thread to form geometric shapes like pyramids or cubes.
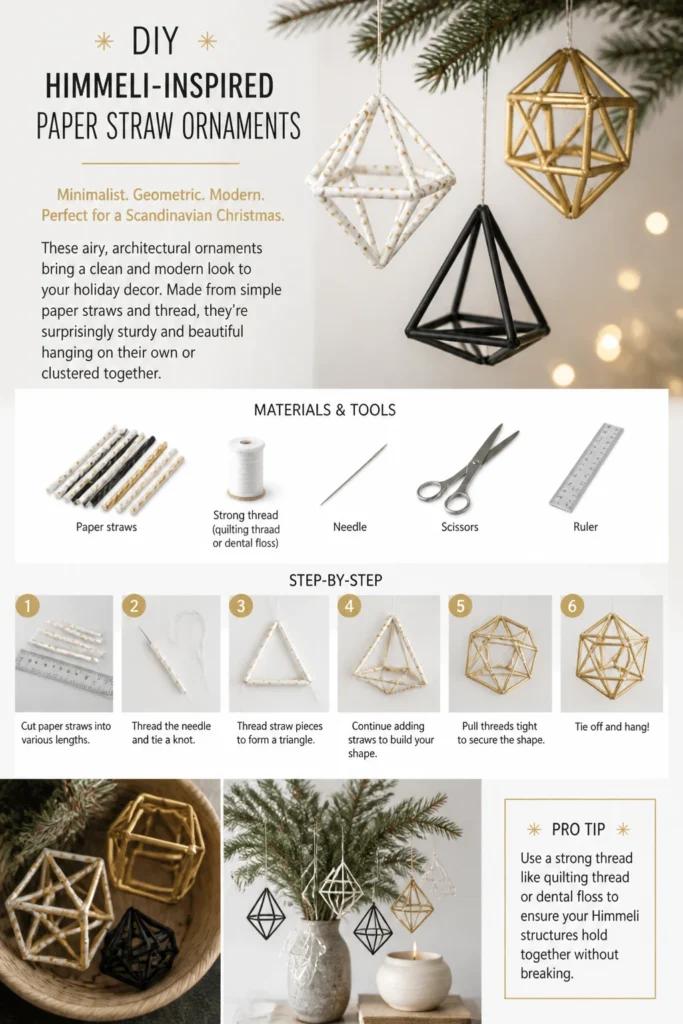
Go for white, gold, or black straws for a truly modern look. They look fantastic hanging on their own or clustered together for a striking display. A little patience goes a long way here.
Pro Tip: Use a strong thread like quilting thread or even dental floss to ensure your Himmeli structures hold together without breaking.
Our Top Recommended Finds
- Precision Craft Knife Set: Essential for those intricate cuts and scoring lines, making your projects look super professional.
- High-Quality Cardstock Variety Pack: You’ll need sturdy paper in all the festive colors and finishes to truly bring these ideas to life.
- Fast-Drying Craft Glue: Because nobody has time to wait around for glue to dry when there’s a whole house to decorate.
Which of these will you try first?
So there you have it, fifteen ridiculously easy and utterly charming paper craft ideas to deck your halls without breaking a sweat (or your budget). These aren’t just crafts; they’re stress-busters and mood-boosters.
Honestly, which one of these paper-tastic projects are you diving into first? Let us know in the comments; we’re always here for your creative triumphs (and maybe a few funny fails).